CSA WEEK 9

P I C K L I S T

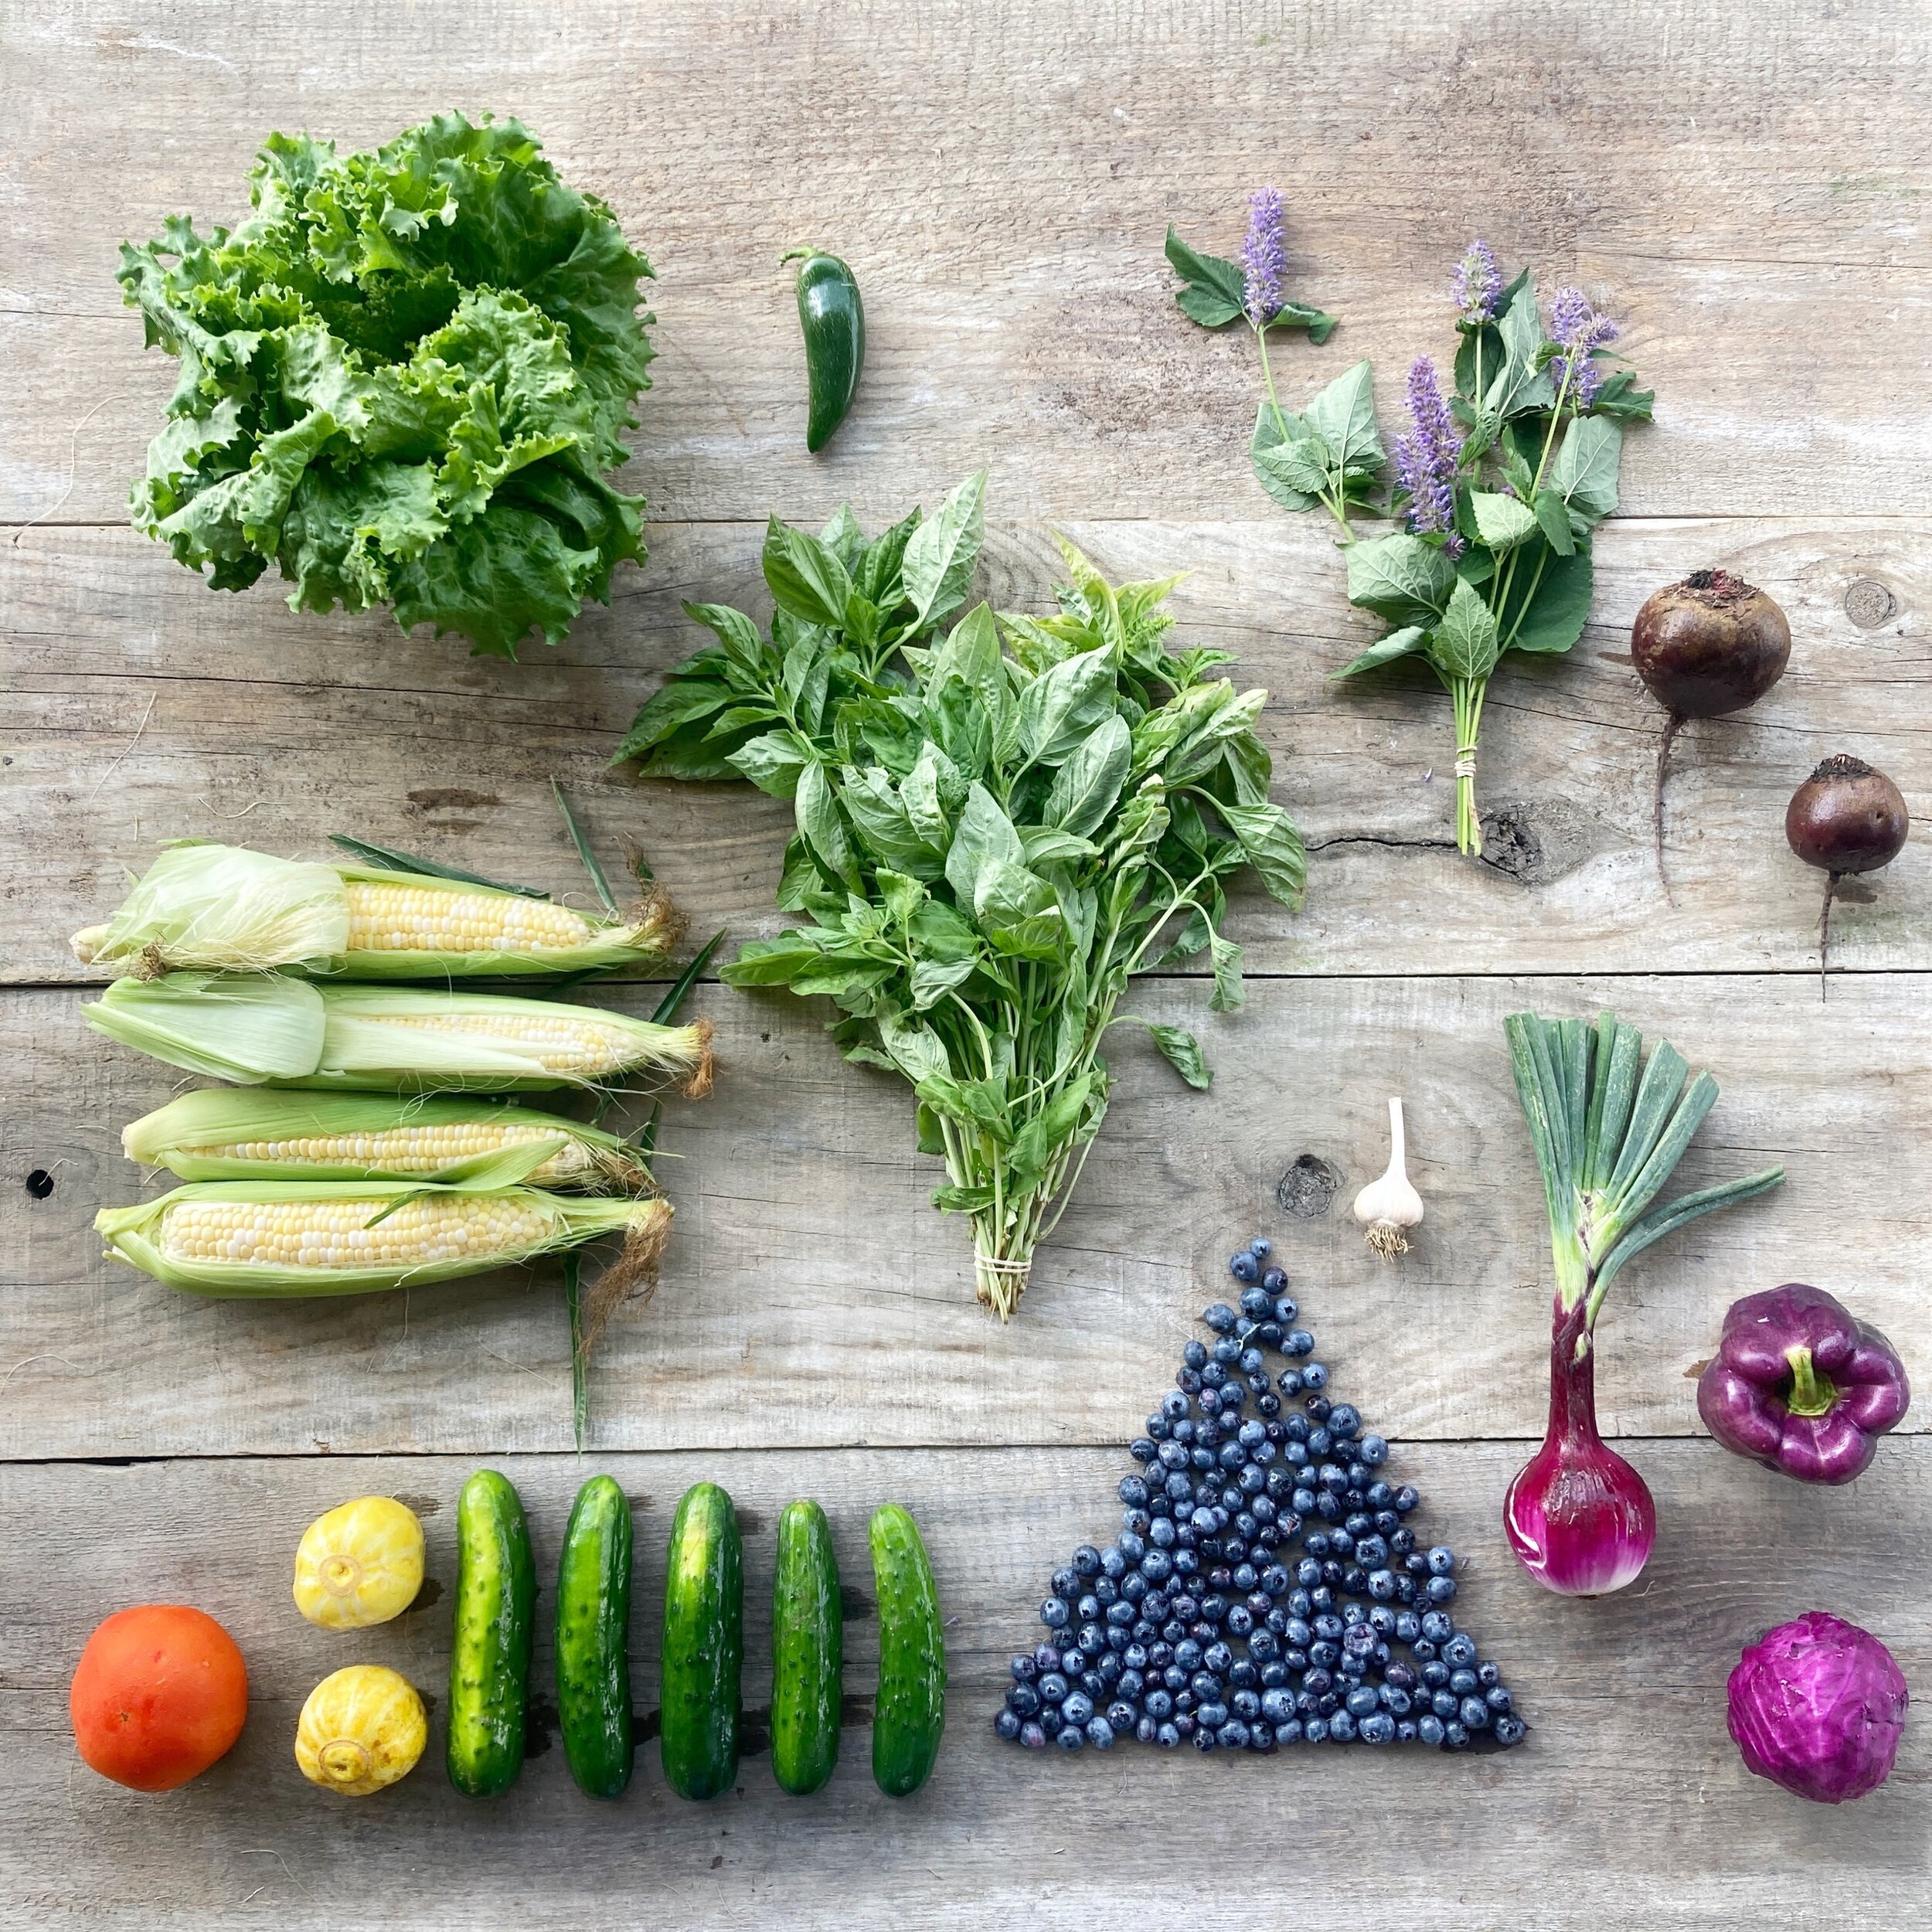
CORN - LETTUCE - PURPLE CABBAGE - BASIL - GARLIC - (softy) BLUEBERRIES - TOMATO - BEETS

LEMON CUKES - SLICING CUKES - ANNISE HYSSOP - PURPLE PEPPER - HOTTY PEP JALAPENO - RED ONION

A496E566-3219-4B1D-9318-14C66E857DDA.jpg

Lengthy pro-tip section, so not a lot of room for updates but I can tell you this:  My heart is totally bursting from the back to back blueberry-pick-pop-ups.  It just feels so good to be able to welcome you all into the fields again!  And the turn out for both days and the good vibes all around are really and truly what CSA dreams are made of. Well, that and a ½ bushel box full of kimchi making crops (napa cabbage/bok choy/ginger/hot pepper/scallions/etc… who’s with me on this?).

In other news, last week Mother Nature finally started to lighten up on us and now we are getting some proper summer weather.  The cukes and summer and zucchini just started to really kick in. Melons are on the verge of major harvesting and the flavor has been pretty good considering the water and lack of sun. Cherry and grape tomatoes should be coming in to it pretty soon as well. We have made most of our final direct seedings outside with the exception of a few more radishes and a spinach seeding for fall.  FALL!!! EGADS, NOT READY!!  We continue to plant broccoli, cabbage and cauliflower in hopes of some favorable September/October conditions, but goodness gracious at this point it’s all a crapshoot.

PRO TIPS:

SOFTY BLUES… YES! YOUR BLUEBERRIES ARE QUITE SOFT! THIS IS NOT AN ILLUSION… Here is the deal, as blueberry season marches on, the picking conditions are less than ideal.  Literal branches hanging out in standing water.  The field we are currently on is soaked- therefor the berries are super soaked.  Nobody is pumped, HOWEVER, these berries can be combined with your berries from PYO on Saturday and transformed into the most beautiful and flavorful smoothie/pie/jam/sauce etc… OR FREEZE these blues, and in the winter when you are desperate for some summertime flavorflavs, thaw out, combine with yogurt, and soft blueberries will never be more welcome.  

JENNY’S NOTE: THE FOLLOWING IS ENTIRELY FROM THE BON APPETIT WEBSITE, BUT I WHOLE-HEARTEDLY AGREE WITH THE FOOD PROCESSOR SENTIMENT.  IF YOU CAN FIGURE OUT AWAY TO GET ONE (THEY ARE SO EXPENSIVE I KNOW!!!) THEY ARE TOTALLY WORTH THE INVESTMENT. IT’S A SUMMER EATING SEASON MUST… You will need a food processor—if you don’t have one, we highly recommend making this an excuse to get one; it’s a good investment that you’ll use forever and ever and ever—and a handful of ingredients like basil, pine nuts, olive oil, Parmesan, garlic, and salt. The key for this classic pesto is to add the basil at the very end instead of blending everything all at once. That way the herbs will maintain their verdant color without bruising or losing flavor.

Ingredients

MAKES ABOUT 1½ CUPS

½ cup pine nuts

3 oz. Parmesan, grated (about ¾ cup)

2 garlic cloves, finely grated

6 cups basil leaves (about 3 bunches)

¾ cup extra-virgin olive oil

1 tsp. kosher salt

Step 1

Preheat oven to 350°. Toast pine nuts on a rimmed baking sheet (or quarter sheet pan), tossing once halfway through, until golden brown, 5–7 minutes. Transfer to a food processor and let cool. Add cheese and garlic and pulse until finely ground, about 1 minute. Add basil and place the top back on. With the motor running, add oil in a slow and steady stream until pesto is mostly smooth, with just a few flecks of green, about 1 minute. Season with salt.

Do Ahead: Pesto can be made 1 day ahead. Top with ½" oil to prevent browning. Store in a covered container (an extra drizzle of oil on top will help prevent oxidation) and chill.

Step 2

If you want to use this with pasta, cook 12 oz. dried pasta (we prefer long pasta for pesto) in a large pot of boiling salted water, stirring occasionally, until al dente. Drain, reserving ½ cup pasta cooking liquid.

Step 3

Place pesto and 2 Tbsp. unsalted butter, cut into pieces, in a large bowl. Add pasta and ¼ cup pasta cooking liquid. Using tongs, toss vigorously, adding more pasta cooking liquid if needed, until pasta is glossy and well coated with sauce. Season with salt.

Step 4

Divide pasta among bowls. Top with finely grated Parmesan.


Anise hyssop:

So fragrant! Bees love it! So beautiful! So productive! So medicinal! So delicious! The list goes on and on.  This herb, with a flavor of licorice-mint, steeps beautifully in hot water for a divine summer tea meant to ward off the expected Summer cold, and soothe the ever racing Summer brain.  

MEDICINAL PROPERTIES:

-alleviates fever and reduce bacterial and viral load in case of illness.  Anti-inflammatory

- soothing cough suppressant

- encourages relaxation

How to use

Teas: Add fresh Anise Hyssop to a jar and cover with boiling water. Eyeball 6-8 tablespoons of fresh herb per quart jar (including flowers!). Cover and let steep until cool enough to drink. Strain and drink, or cool and refrigerate to save for iced tea.

 Other: The leaves and flowers are edible. Add to savory or fruit salads, smoothies, or baking projects. 


Garlic noodles (FROM THE OFFICIAL COOKBOOK OF SUMMER ‘21): 

BURMA SUPERSTAR: ADDICTIVE RECIPES FROM THE CROSSROADS OF SOUTHEAST ASIA by Desmond Tan and Kate Leahy

 ¼ cup canola oil

4 tblsp. minced garlic

¾ cup sliced red onion soaked in water and drained

2 tblsp. Soy sauce

½ cup sriracha

1 tblsp. Minced ginger

¼ teaspoon sugar

¼ teaspoon salt

2 tblsp. Water

12 ounces fresh wide wonton noodles or dried chinese wheat noodles

1 cucumber thinly sliced

3 green onions thinly sliced (sub in your onion tops!)

 In a small pot, heat the oil over medium heat.  Add 3 tablespoons of the garlic, set the heat to low, and fry, swirling the pot frequently, until the garlic is nearly golden in color, no more than 3 minutes.  (If the garlic starts to darken too quickly, pull the pot off the heat for 30 seconds before returning it to the heat).  Because the garlic can burn quickly, watch the pot the while time while the garlic fries.

 Immediately pour the oil into a heatproof bowl and let it cool.  The garlic will continue to cook and turn golden as it sits.  If the garlic is already golden brown before you take it off the heat and it looks like it might burn if left in the oil, all is not lost.  Pour the oil through a fine mesh strainer into a heatproof bowl to remove the garlic from the oil and stop it from cooking further.  Once the oil has cooled a bit, return the garlic to the oil.  

 Add the onions and soy sauce to the garlic.  

 In a small serving bowl, stir together the sriracha, the remaining 1 tablespoon of garlic, the ginger, sugar, salt, and water.

 Bring a pot of water to a boil.  Add the noodles and cook, stirring often with chopsticks, until nearly soft all the way through, about 4 minutes or until tender but still slightly chewy.  Drain in a colander and rinse briefly under cold water.  Give the colander a shake to remove excess water.  

 Return noodles to the pot. Pour in the garlic-soy sauce mixture and add the cucumbers.  Give the noodles a stir with a pair of tongs, then divide among bowls.  Top with “green onions”.  Serve with srircha


CSA WEEK 8

- P I C K L I S T -

CORN - FENNEL - DAZZLING BLUE OR LACINATO KALE - RED POTATOES - GARLIC - BLUEBERRIES - TOMATOES - LEMON CUKES - ZUCCHINI - THYME - GREEN\WAX BEANS - CAYENNE PEPPER

3088372D-07DD-47D6-B9A1-D5BB586BAA71.JPG

Are you tired of reading weather farming woes?  Me too… so over it… so, let’s get right into the good stuff:

(THAT SAID… If we don’t get some heat and sun our crops will just sit there forever: green, unripen, and in field limbo)

MOVING ON!!  WE ARE DOING IT AGAIN!! Blueberry gleaning #2

Taking place this SATURDAY! Hosted by Mrs. T! 

AND now, the details… BUT, email me if you have any questions at all (jenny@edgewaterfarm.com):

WHO:  Open to the entire Edgewater Farm C.S.A. community

WHERE:  if you are coming from the North End of River Road, go past the Greenhouses and McNamara Dairy- turn at the Cemetery.  

THE ADDRESS for all your googling: 355 River Road/ Plainfield, NH

WHEN: This Saturday!!!, August 7th from 10-NOON;  rain or shine though we will cancel in case of thunder and lightning

HOW: You pick!  Bring your own containers, we will have zero supplies for you to pick into.  FYI, if you have a used yogurt container and a shoelace, poke holes in in the yog. container and make yourself a picking necklace- it’s fashion forward and an extremely efficient way to pick- very hip, all the kids are doing it.  

WHY: BECAUSE, MORE BERRIES ARE RIPENING and sharing is caring.  

PRO TIPS:

THYME: to store fresh… Wrap in a damp paper towel in a plastic bag. Keep in refrigerator.

OR… AIR-DRYING THYME

Create a small thyme bouquet, tying the sprigs together at the stem with a piece of twine/string.

Hang the herbs (from more string) on a clothes hanger, or use a herb drying rack in a well-ventilated, warm area away from direct sunlight.

The thyme will take between 1-2 weeks to dry, depending on the weather and climate. From there, put in air tight glass jar.  

Lemon cukes:

Do not mistake for baseballs, tennis balls, etc… these little yellow balls are in fact cucumbers and they delightful., Slice fresh with a little salt and pep, if the spirit moves ya.  .  

A crisp salad of pole beans, fennel, and parmesan cheese 

From my tried and true old standby eating bible, TENDER by Nigel Slater

Green beans 

Medium fennel bulb

Small, salad leaves (such as arugula) 4 double handfuls… (kale could work here- it wont give the same spicy bunch, but it will act as a green filler)

White bread- 2 thick slices

Oil for frying the bread

For the dressing:

Tarragon vinegar- a tablespoon 

Dijon mustard- a teaspoon

An egg yolk

Olive oil- a scant ½ cup

Grated parmesan cheese- 3 tablespoons, plus a block of parm for shaving

Lemon juice- 2 teaspoons

Trim the beans and boil them in lightly salted water or steam them, until tender.  Drain them under cold running water.  Cut the fennel bulb in half and shred finely.  Make the dressing by whisking the vinegar, mustard, and egg yolk together with a little salt and black pepper, then beating in the oil followed by the grated cheese.  It should be thick and creamy.  Squeeze in the lemon juice, stir, then set a side for a few minutes.  

Put the salad leaves in a large bowl with the cooked beans and the fennel.  Cut the bread into small squares and fry in shallow oil until golden on all sides.  Drain the croutons on paper towels.  Toss the leaves and beans lightly with the dressing.  Pile the salad in to two plates and shave pieces of parmesan over with a vegetable peeler.  I usually do at least 8 per salad, depending on my dexterity with the peeler.  Tip the hot croutons over the salad and eat straightaway while all is fresh and crunchy.  

SOUR CREAM SLAW WITH FENNEL

From my second favorite cook book, START SIMPLE by Lukas Volger

1 small savoy or napa cabbage (though i think your kale shredded could work here instead!)

1 medium fennel bulb, cored and very thinly sliced, fronds reserved

¼ cup sour cream

1 tablespoons olive oil

1 tablespoon fresh lemon juice

1 teaspoon or more herbs de provence (thyme!!! Oregano, rosemary, etc)

½ teaspoon salt, or to taste

¼ teaspoon sugar

Pinch red pepper flakes

In a serving bowl combine the cabbage (kale) and fennel.

In a small bowl, stir together the sour cream, olive oil, lemon juice, herbes de provence (thyme etc!), sugar, and red pepper flakes.  Taste and season with salt.  Add most of the dressing to the cabbage (kale) and fennel and taste, adding more if needed (you may have some dressing left over).  Coarsely chop about 3 tablespoons of the fennel fronds and stir them in.  You can eat this slaw immediately, but the flavors will meld a bit after and hour or so at room temperature.  

CORN!!!

This is not a recipe but a gentle suggestion: mix together mayo and sriracha.  Slab it on corn.  Garnish with cilantro if you got it.  

Devour.  You’re welcome.


CSA WEEK 7

- t h e p i c k l i s t -

SHISHITOS! - BELL PEPPER - ROMAINE LETTUCE - RED KALE - GREEN BEANS - FLAT PARSLEY - CARROTS - BLUEBERRIES - PATTY PAN SQUASH - DANGJO CHEONG YANG (PURPLE HOT PEPPER) - TOMATOES

7EB4F832-8350-4668-97FC-5000862CAE8E.JPG

No one is surprised to hear that this newsletter was written inside a dry farm office space while torrential madness was going on outside. Also, prior to dry office salvation, Kayleigh and i were cutting the last bunches of parsley from the field… and then it started. from light rain to heavy rain, with all the gusts included, there were too many curse words to name at this moment and I’m going to be perfectly frank with you and say- there was 0 fun being had.  My boots are once again filled with water, the fields are once again overwhelmed with moisture, the crew is attempting a blueberry pick in this mess, I’m pissed.  If you listen closely, and raise your ear to the wind just right, i bet you can catch a listen to the collective farmer grunt of frustration heard round the Upper Valley, etc… this is a tough year for job production/field production/general lifestyle that so heavily depends on the weather.


But to sweet us all up, let’s go pick some blueberries…

Taking place this SATURDAY, it’s a Pop-up PYO Blueberry “glean” 

I put the glean in quotations, because it is not the end of the season by any means, and these berries are good!- so it’s more like a PYO til your heart’s content.  Why are we doing this?  Because, why not- yall are great, our crew has moved on from this field to another and tis the season to harvest! 

AND now, the details… BUT, email me if you have any questions at all (jenny@edgewaterfarm.com):

WHO:  Open to the entire Edgewater Farm C.S.A. community

WHERE:  if you are coming from the North End of River Road, go past the Greenhouses and McNamara Dairy- turn at the Cemetery.  

THE ADDRESS for all your googling: 355 River Road/ Plainfield, NH

WHEN: This Saturday!!!, JULY 31st from 11:30-1:30pm;  rain or shine though we will cancel in case of thunder and lightning

HOW: You pick!  Bring your own containers, we will have zero supplies for you to pick into.  FYI, if you have a used yogurt container and a shoelace, poke holes in in the yog. container and make yourself a picking necklace- it’s fashion forward and an extremely efficient way to pick- very hip, all the kids are doing it.  

WHY: So many reasons, here are a few... because it's awesome, the berries are free and delicious, it's the end of July and this is what you do as we enter August: pick and preserve!

 PRO TIPS:

½ cup mayonnaise

1½ tsp. (or more) Sriracha

1lb. thick-cut bacon (thin strips have a tendency to get burnt and overly crisp)

8 ½"-thick slices white sandwich or Pullman bread

2 ripe medium beefsteak tomatoes, cut into thick slices

Flaky sea salt

Freshly ground black pepper

½ head of iceberg lettuce, leaves separated

Step 1: Prepare a grill for medium heat. Stir together mayonnaise and Sriracha in a small bowl. Taste and add as much Sriracha as desired to meet your preferred level of spiciness.

Step 2: Arrange bacon strips across grate and grill until lightly charred around the edges, 5–7 minutes. (Flare-ups are common, so lower the lid if needed and carefully raise just to check doneness.) Turn bacon over and grill until browned and crisp, about 4 minutes. Cooking times can vary significantly based on how thick your bacon is and the heat of your grill. (If you’re grilling bacon for the first time, keep a close eye on it and check often.) Transfer bacon to paper towels to drain.

Step 3: Arrange bread on grate and grill until toasted, about 30 seconds per side. Transfer to a cutting board.

Step 4: Spread Sriracha mayonnaise over 1 side of each slice of bread. Season tomatoes with salt and pepper, then build sandwiches with lettuce on the bottom, tomatoes in the middle, and bacon on top (tear lettuce leaves and cut bacon in half to fit nicely if needed). Close up sandwiches and slice in half on a diagonal.

Step 5: You can also serve this as a BLT buffet: Arrange toast, bacon, tomatoes, and lettuce on platters with Sriracha mayo and salt and pepper alongside and let everyone make their own. 

1 pound SHISHITOS

2 tablespoons olive oil

Kosher salt and freshly ground black pepper

1tablespoon fish sauce (such as nam pla or nuoc nam)

Lime wedges (for serving)

Step 1: Prepare a grill for medium-high heat. Toss chiles with oil on a rimmed baking sheet; season with salt and pepper.

Step 2: Grill chiles on a grill topper, turning occasionally, until blistered and charred, about 5 minutes. Transfer to a platter; drizzle with fish sauce and serve with lime wedges for squeezing over.


And while the grill is on… PATTY PAN SQUASH!!  

Cut into thick slices, pattypan squash, which look sort of like small flying saucers, can make a juicy sort of “steak” that could be topped by a pungent sauce. Grill or roast the “steaks” and serve them with this gorgeous green sauce. You’ll need only half the amount of salsa verde that this recipe yields, but it keeps very well in the refrigerator and it’s great to have on hand.

  • 1 to 2 garlic cloves (to taste), halved, green shoots removed

  •  Salt to taste

  • 1 anchovy fillet, rinsed (optional)

  • 1 tablespoon capers, rinsed and chopped

  • ¼ cup extra virgin olive oil

  • ¾ cup (tightly packed) parsley leaves (25 grams)

  •  Freshly ground pepper

  • 2 pounds large pattypan squash

  • 2 tablespoons extra virgin olive oil

  •  Salt and freshly ground pepper

  1. Combine the garlic, salt, anchovy fillet and capers in a mortar and pestle and grind to a paste. If you wish to make the sauce in a mini food processor or with an immersion blender (an immersion blender works very well, especially if it has a strong motor), transfer to the processor or place in a jar. Add the parsley. If using a mortar and pestle, grind together until you have a paste. If using a food processor or an immersion blender, add the olive oil with the parsley and blend to a purée. If using a mortar and pestle, slowly drizzle in the olive oil and work into the mixture. Continue to grind until you have a very smooth mixture. Season to taste with salt and pepper. If serving within a few hours, allow to sit at room temperature. Otherwise, refrigerate. Allow to come to room temperature before serving.

  2. Heat a cast-iron skillet over high heat, and preheat the oven to 450 degrees. Line a sheet pan with parchment. Alternately, prepare a hot outdoor grill.

  3. Slice the squash 3/4 inch thick and toss in a bowl with the olive oil and salt and pepper to taste. Sear in the hot pan for 1 to 2 minutes on each side, until the surface is lightly browned, and transfer to a sheet pan. Place in the oven and roast for 5 minutes. Using tongs, turn the pieces over and roast for another 5 minutes, until they are sizzling and tender all the way through. Remove from the heat. If grilling, grill the pieces for about 5 minutes on each side, until they are tender all the way through and beginning to drip.Transfer the squash slices to a platter. Top each one with a teaspoonful of the salsa, and serve hot or warm.

  4. Transfer the squash slices to a platter. Top each one with a teaspoonful of the salsa, and serve hot or warm

 YOUR HOT PEPPER OF THE WEEK:

Dangjo Cheong Yang is a unique Asian pepper that is similar in pungency and appearance to a serrano. The fruit are purple in color and ripen to a deep dark red color. It’s easy to harvest and uniform. Outstanding yield and good ripening ability in short season growing areas.


CSA WEEK 6

P I C K L I S T

CABBAGE - POTATOES - BLUEBERRIES - TOMATOES (RED & HEIRLOOM) - THAI BASIL - CELERY - BOK CHOY - SUMMER SQUASH - ZUCCHINI - LITTLE CUCUMBERS - CILANTRO - GARLIC - JALAPENO

IMG_8269.jpg

This week was met with more rain- aka a constant reminder, that it's time for new boots.  Because of the rain crops like your bok choy are currently bathing in standing water.  The bugs are pumped, especially those attracted to wet conditions (hence the little spots on said bok choy).  To be perfectly honest with all of you, it sucks.  YES the fields are wet, and yes the fields need moisture, but goodness gracious the crops will soon drown and rot.  I’m not entirely bummed out just yet, the 10 day forecast looks promising enough.  But let it be known that every drop of rain that comes out of that sky right now is met with an extreme grunt made by yours truly- and probably every other farmer in our region.  

Moving on from the weather (is that even possible??!) The flower fields are exploding with color as we usher in Anne & Mrs. T’s  cut flower CSA.  For those that pick up at the farmstand, you can catch a glimpse of the zinnia field from 12A and it is GLORIOUS. 

In other field reports- mesh lining was added to the tomato greenhouses to frustrate pests looking to enter, THE GREAT ANNUAL GARLIC HARVEST came and went- pretty lackluster harvest due to it not being that fun to pull garlic when the earth is so heavy with moisture (but we still love our garlic crop!!), blueberry season has begun, the heirloom tomatoes are finally catching up with the red tomatoes,  and if we haven't already entered peak summer harvesting and eating, we are getting pretty close to it.  

PRO TIPS:

Your tomatoes:  do you see cracks in your tomatoes?! Great! that means they are ripe for the eating.  Do not sleep on this fruit.  Eat asap, nothing beats a juice ripe just picked tomato in the summertime.  

Thai basil, cilantro, etc… These veggies with the listed herbs are pretty much begging to be incorporated into a vietnamese style rice noodle bowl and or fresh spring rolls.  I am running out of room here for recipes, so give it a google if you need inspo.  

Fried garlic chips 

from my new fave cook book, 

BURMA SUPERSTAR: ADDICTIVE RECIPES FROM THE CROSSROADS OF SOUTHEAST ASIA

by Desmond Tan and Kate Leahy

Makes about ⅓ cup fried garlic and about ½ cup garlic oil

Ingredients:

½ cup thinly sliced fresh garlic

½ cup canola oil (though i used olive oil and it turned out great)

Line a heat proof bowl with a strainer.  Line a plate with paper towels.  In a wok or small saucepan, heat the oil over medium heat for a minute or two (the oil shouldnt be scorching hot).  Add the garlic and gently stir into the oil.  When bubbles start to form rapidly around the garlic, decrease the heat to low and cook, stirring often, until the garlic is an even golden color and nearly completely crisp, about 3 minutes.  If the garlic starts to darken too quickly, remove it from the heat and let it continue to fry in the oil.  If the garlic needs more time to fry, return the wok to low heat and continue to fry.  

Pour the contents of the wok into the strainer lined bowl.  Lift the strainer up and shake off of the excess oil.  Scatter the garlic onto the lined plate.  The garlic should crisp up as it cools.  The chips can be stored in an airtight container at room temperature for 1 month.  Stor the oil in fridge for upto 6 months.  

Ginger salad

Again, from my new fave cook book, 

BURMA SUPERSTAR: ADDICTIVE RECIPES FROM THE CROSSROADS OF SOUTHEAST ASIA

by Desmond Tan and Kate Leahy

JENNY’S NOTE: I KNOW I KNOW, there is no ginger in your box this week to pickle- and also no romaine lettuce, BUT make do with what you DO have.  For example i used pickled radishes instead of the pickled ginger and this Summer salad remained so bomb.  It’s basically all I want to eat now, you’re welcome.  ALSO I think the THAI BASIL would be awesome in this- give it a shot.  

4 cups thinly sliced romaine lettuce

1 ½ cups shredded cabbage

3 heaping tablespoons pickled ginger, chopped

2 tablespoons fried garlic chips

3 tablespoons fried yellow split peas

3 tablespoons cilantro

2 tablespoons sunflower seeds

2 tablespoons coarsely chopped toasted peanuts

2 tablespoons minced jalapenos

1 tablespoon sesame seeds

1 ½ tablespoons toasted chickpea flour

1 ½ tablespoon onion oil 

2 tablespoon juice from the ginger pickling liquid

2 teaspoon fish sauce

¾ teaspoon salt

1 lime or lemon cut into wedges

In a salad bowl, combine the lettuce, cabbage, pickled ginger, fried garlic, split peas, cilantro, sunflower seeds, peanuts, jalapenos, and sesame seeds.  Sprinkle chickpea flour over the top and drizzle with oil and pickling liquid.  Add the fish sauce and salt (use more salt if not using fish sauce).  Squeeze 1 or 2 lime wedges over the top.  Using your hands, mix well and taste, adding more salt or lime juice if needed. 

JENNY’S NOTE: CHOP AND ADD YOUR CELERY HERE… OR USE IT in ANY OTHER RENDITION OF POTATO SALAD 


4 pounds potatoes 

1 3/4 cups Greek yogurt (I used full-fat but I think other fat levels would work)

1/4 cup sour cream

2 tablespoons freshly squeezed lemon juice (from half a big lemon)

1 tablespoon white wine vinegar

1 tablespoon minced fresh dill

1 medium garlic clove, minced

2 teaspoons kosher salt (I use Diamond brand; use less if you use another, read why here)

Freshly ground black pepper

1 cucumber (1 pound), unpeeled but quartered lengthwise, seeds removed

More ideas for additions: Crumbled feta, chopped green olives, chopped fresh mint leaves or a minced hot chile

In a medium pot, cover your potatoes with cold water and bring them to a boil over high heat. Once boiling, reduce heat to medium-high and let potatoes simmer until tender enough that they can be pierced easily with a skewer or slim knife. I find that small potatoes tend to be done in roughly 30 minutes from the time I put them on the stove cold, but it’s best to start checking 5 to 10 minutes sooner. Drain potatoes and let them cool completely. (This is a great step to do ahead, as it seems to take potatoes forever to cool. If you’re really in a rush, spread them on a tray and pop them in the freezer for 10 minutes.)

Meanwhile, in the bottom of a large bowl, stir together yogurt, sour cream, lemon juice, vinegar, dill, garlic, salt and lots of freshly ground black pepper.

Grate the cucumber on a box grater (or in your food processor’s shredding blade, if you like to get things done in one hundredth of the time) and try to remove some of the excess by squeezing out handfuls, pressing it in a mesh sieve with a spoon or wringing it in a square of cheesecloth or a lint-free dishtowel. Add to yogurt mixture.

Once potatoes are cool, cut tiny ones into quarters or larger ones into generous chunks. Add to cucumbers and yogurt and stir to coat. Add any extra ingredients desired. Adjust seasonings to taste. Either eat immediately or keep in the fridge for up to three days.

CSA WEEK 5

p i c k l i s t

CABBAGE - CELERY - BEETS - CARROTS - SHISO - 

 TULSI BASIL - FENNEL - CAULIFLOWER

CSA FRAAAANDS!!  On account of way too many crops that will leave y’all scratching your heads wondering what exactly you signed up for, I am skipping the farm updates and moving right into PRO-TIPS.  And if anyone needs more on how we spent this week in farming, I can assure you this.  No one went home dry.  Yes, our wells and water-tables are pumped but ugggh my feet exist in a constant prune state.  

PRO TIPS:

SHISO:  This week we are going to try something new.  We are all going to use SHISO (the beautiful reddish purple bunch in your CSA) and learn this herb together.  Full disclosure, I know nothing about it.  I’ve eyed it for years- heard stories of pickling and fermenting, garnishing, juicing, etc.  But this year we have a really beautiful crop and it’s time to expand our horizons.   

(Delicious Korean pickled perilla (shiso) leaves in soy sauce brine)

32 leaves shiso

SEASONING SAUCE (MIX THESE IN A MEDIUM-SIZED BOWL)

10 Tbsp soy sauce

1 tsp Korean chili flakes (gochugaru)

1 tsp minced garlic

2 Tbsp brown sugar

2 Tbsp spring onion , finely chopped

2 Tbsp green chilies or red chilies, finely chopped

Rinse the shiso leaves in cold running water and drain/air dry them while left in the colander.

While waiting for the perilla leaves to dry, prepare the seasoning sauce.

Place the perilla leaves in stacks in a large (glass) container (with a lid). Spread (about 1 Tbsp worth of) seasoning sauce on top of the perilla leaf. Repeat this process for every 3 leaves for the rest of the leaves. As it is already stacked, you will have to lift the leaves at every third interval with one hand while the other hand is spreading the sauce. You don’t need to spread the sauce on every leaf. If you have any sauce leftover, pour it onto the stacked leaves. If you run out of sauce, tip the container and scoop out the sauce from the bottom corner of the container and spread it over the perilla leaves.

Close the lid and move the container to the fridge. You can start eating this from the next day. Serve it with a hot bowl of rice. (It can be stored in the fridge for at least one week. Though traditionally this dish was made during the summer months when many perilla leaves are available and consumed through the summer to winter.)

18 oz Red/Purple Shiso leaves * 1 or 500g

2 cups water 

1/2 cup sugar

1/4 cup apple cider vinegar

Instructions

  1. Prepare shiso leaves to boil. Wash and trim the shiso leaves.

  2. Bring the 2 cups of water to boil in a large sauce pan and add the prepared shiso leaves.

  3. Turn the heat down to medium heat and cook the shiso leaves for about a few minutes. The leaves colour will change from purple to a greenish colour.

  4. Drain the shiso leaves with a strainer and squeeze the leaves to extract as much as you can. It is hot so be careful not to burn your fingers. I used a spoon to extract all liquid.

  5. Place the drained liquid back to the saucepan and bring it simmer.

  6. Add the sugar, and when the sugar is dissolved, turn the heat off and add the apple cider vinegar.

  7. Cool it down and keep it in a clean bottle in a fridge.  If you sterilize the container in which you keep the syrup, it will last about 6 months in the fridge.

  8. To make shiso juice, place 1/4 cup of the syrup into a glass and pour about 200 ml of mineral water or fizzy soda water over the top. Add ice cubes.

Tulsi: Tulsi, or Holy Basil.  This herb, I LOVE.  Tulsi, the green bunch in your box topped with little purple flower is an herbal adaptogen.  My dear friend and favorite herbalist Rachael Keener of ALKAME CO. wrote the following about adaptogens,

 “ADAPTOGENS ARE CONSIDERED HERBAL SUPERSTARS BECAUSE OF THEIR UNIQUE ABILITY TO SUPPORT A HEALTHY STRESS RESPONSE. In what can sometimes feel like the barrage of the modern era, these plants stand beside us fostering grace and balance while offering their generous hand of support.

What’s even more impressive about adaptogens is that we’re not just talking about resilience to the occasional stress of the modern demands of work, family, etc. They may also support our body’s response to environmental stressors like pollutants in our water, and chemicals in our body products. These too pose a challenge unique to the times we are living in.

Interestingly, adaptogens don’t have one specific way in which they act. Instead, they act as harmonizers. Their diverse chemistry helps balance our diverse chemistry and supports the stability of our neuroendocrine and immune systems (aka how we perceive and respond to mental/emotional and environmental/chemical stressors). Science has identified some of the ways in which adaptogens do this, but due to their broad-ranging mechanisms of actions, every aspect of how they work has yet to be clearly defined.    

Adaptogens are, by definition, considered appropriate for long-term use… Best adopted as daily tonics, they build our resilience over time. They are not an instant fix, and they do not stand alone as a replacement for other forms of self-care. Instead they stand firmly behind us, supporting lifestyle changes that promote resilience in this wild world*.

With self-care and adaptogens at our side, we can restore our ability to be actors in our worlds. We can orient to action, rather than reaction.  The world is indeed a crazy place, and yet we still belong to it. Lean on your plant friends when the going gets rough and you notice that you’re having a hard time adapting or finding balance. They make pleasant companions and reflect back to us how to welcome ourselves home no matter what is happening around us.”

MORE ON Tulsi from Urban Moonshine… “Tulsi, in particular, is one of the few adaptogens that come in a green leafy form, this plant supports our nervous system during periods of occasional stress and burn out. It's sweet, spicy vanilla aroma and taste make it a favorite one to uplift the spirit.  It's a favorite in tea, as well as smoothies, salads and fresh juices.” 

All this being said, I remember when I was pregnant my midwife discouraged tulsi… Not entirely sure why- but if you are a pregnant person, please ask your midwife first.  

TULSI TEA

  • 1 cup water

  • 1 tsp-2 tsp dried tulsi, or 4 tsp fresh (really based on the taste you prefer)

  1. Bring the water to a boil. Remove from the heat and pour over the tulsi in a heat-safe container.

  2. Allow the tea to steep, covered, for 10-15 minutes.

  3. Strain tulsi from tea and enjoy daily.

USE FRESH LEAVES:  Add chopped leaves to culinary dishes just as you would basil. Freeze leaves in ice cubes to add to summer drinks.  Eat a few fresh leaves to get phytonutrients and boost your immunity.  

TULSI is also found in tinctures, infused honeys, elixirs, vinegars etc… for more on that give it a google.  

Caramelized fennel with parmy frico

by Molly Baz from the book: COOK THIS BOOK 

(recommended by Coreen at the farmstand!)

3 large fennel bulbs with fronds

1 lemon

2oz Parmesan cheese

¼ cup plus 1 tablespoon extra virgin olive oil

salt & pep

Position a rack in the lower third of your oven.  Preheat the oven to 425*f

Prep the fennel and Parm:

  • Trim off the long stalks of 3 fennel bulbs, right where they meet the bulb.  Reserve about half of them; discard the rest.  Trim the root ends of the bulbs if they are looking a little brown and sad.  Discard any bruised outer layers of the fennel bulbs.  Position each bulb upright on your cutting board, root-end down, and cut into ½-inch thick planks.  Transfer the planks to a large rimmed baking sheet.

  • Drizzle the fennel planks with ¼ cup olive oil, being sure to coat them evenly and all over.  Season with salt and black pepper.

  • Using a microplane, finely grate 1 ounce of Parmesan cheese (about ¼ cup) over the fennel (on top only, no need to flip).  Roast until the fennel is deeply caramelized on the underside, 20 to 25 minutes.

  • Remove from the oven and flip each plank.  Finely grate 1 ounce more cheese (about ¼ cup) over the caramelized side of the fennel.  Return to the oven and roast until tender and browned all over, 10 to 15 minutes longer.  

Prep the raw fennel salad:

  • While the fennel roasts, pluck any fronds attached to the reserved fennel stalks and coarsely chop them.  Thinly slice the fennel stalks crosswise into coins.  Transfer everything to a medium bowl.

  • Cut 1 lemon in half; squeeze the juice from both halves over the raw fennel.  Drizzle with 1 tablespoon olive oil, season with salt and black pepper, and toss well to dress the fennel.  Taste and adjust the seasoning if it needs it.  

SERVE: Transfer the roasted fennel planks to a serving dish.  Scatter the r


CSA WEEK 4

p i c k l i s t

LETTUCE - CELERY - HAKURAI TURNIPS - CARROTS - ZUCCHINI - 

BASIL - CUCUMBER - TOMATO -  BROCCOLI

0E848D2B-3486-4529-84E0-9311EA70560C.JPG

We are currently in the works of wrapping up our 2021 strawberry season.  The heat followed by the rain did all it could to melt the crop.  While there is still good fruit out there, it’s not enough to keep the PYO community happy.  This expected moment in the season is alway met with mixed emotions.  On the one hand, things are good!  We picked a lot of fruit, moved our mornings from 5am to 6am (this feels huge),  the crew is able to start the day upright rather than bent over, the real Summer bounty begins rolling in from the fields, and we are able to tackle the weeds that forever suffocate the fields.

On the other hand, it’s tough:  We had a beautiful berry crop for many weeks, and just like that, the end of June turned up the heat, poured the rain, and the crop went South pretty fast.  Yes, we could have picked off the bad fruit, cleaned up the plants- allowing the strawberries to reach that second wind and their greatest come back- but, there are only so many hands, and while we are a mighty crew, we’re also pooped.  So, there goes strawberry season.  

Typically, at this point I reach out to all of yall and welcome you into the field for a strawberry gleaning.  However, due to the fermenting field out my window, it may not be worth it.  If we DO have a berry gleaning it will take place this Saturday around 3… BUT I need to see how the next few days will affect the crop.  You will know for sure, one way or another by Friday.  

STAY TUNED!!

PRO TIPS:

from smittenkitchen!

SERVINGS: 8 TO 10  TIME: 1 HOUR 20 MINUTES, PLUS OVERNIGHT COOLING   SOURCE: SMITTEN KITCHEN

  • 2 cups (13 ounces or 370 grams) grated, packed zucchini, not wrung out, grated on the large holes of a box grater

  • 2 large eggs

  • 2/3 cup (160 ml) of a neutral oil (I use safflower), olive oil, or melted unsalted butter

  • 1/2 cup (95 grams) packed dark brown sugar

  • 1/2 cup (100 grams) granulated sugar

  • 1 teaspoon vanilla extract

  • 1 teaspoon fine sea or table salt

  • 1 1/4 teaspoons ground cinnamon

  • 1/8 teaspoon ground or freshly grated nutmeg

  • 3/4 teaspoon baking soda

  • 1/2 teaspoon baking powder

  • 2 cups (260 grams) all-purpose flour

  • 2 tablespoons (25 grams) raw or turbinado sugar

Heat oven to 350 degrees F. Lightly coat a 6-cup or 9×5-inch loaf pan with nonstick spray. Place grated zucchini in a large bowl and add oil, eggs, sugars, vanilla, and salt. Use a fork to mix until combined. Sprinkle cinnamon, nutmeg, baking soda, and baking powder over surface of batter and mix until combined — and then, for extra security that the ingredients are well-dispersed, give it 10 extra stirs. Add flour and mix until just combined. Pour into prepared loaf pan and smooth the top. Sprinkle with the raw or turbinado sugar — don’t skimp. Bake for 55 to 60 minutes, until a toothpick or tester inserted into the middle cake but also into the top of the cake, closer to the dome, comes out batter-free.

Let cool completely in the pan. Leave in pan, unwrapped, overnight or 24 hours, until removing (carefully, so not to ruin flaky lid) and serving in slices. Zucchini bread keeps for 4 to 5 days at room temperature. I wrap only the cut end of the cake in foil, and return it to the baking pan, leaving the top exposed so that it stays crunchy.

  By Yotam Ottolenghi  4 servings, time: 1 hour

You can serve these carrots with Greek yogurt, or with homemade labneh, if you start the night before (see Tip below). This recipe calls for making your own dukkah: You’ll have more than you need, but keep any leftovers in a sealed container to sprinkle over salads, grilled meat or fish. A bunch of carrots from your farmers’ market will work best here, but you can also use regular carrots that have been halved or quartered lengthwise. If you can’t find bunches of carrots with their fresh tops, you can prepare the oil using parsley instead, or double the tarragon for an even more herbaceous version.

FOR THE CARROTS AND CARROT-TOP OIL:

  • 2 ¼ pounds carrots with greens attached

  • ¾ cup roughly chopped fresh tarragon leaves

  • ½ cup olive oil, plus more for greasing the pan

  •  Kosher salt and freshly ground black pepper

  • 3 tablespoons honey (runny honey)

  • 1 tablespoon plus 1 1/2 teaspoons apple cider vinegar

  • 1 ⅔ cups full-fat Greek yogurt

FOR THE DUKKAH:

  • ¼ cup blanched hazelnuts, toasted

  • ¼ cup pine nuts, toasted

  • 2 tablespoons coriander seeds, toasted

  • 1 tablespoon plus 1 1/2 teaspoons black and white sesame seeds, toasted

  • 1 teaspoon cumin seeds, toasted

  • 1 teaspoon dried oregano

  • ½ teaspoon sweet paprika

  • ¼ teaspoon kosher salt

  1. Wash and peel the carrots and trim the tops, leaving about 1 inch/3 centimeters of the greens attached. Measure out 1 packed cup/40 grams leafy carrot tops and wash well to get rid of any grit. Squeeze out as much water as possible, and pat dry. Roughly chop the carrot tops then transfer them to a blender.

  2. Add the tarragon, 6 1/2 tablespoons/100 milliliters oil and a small pinch of salt. Blitz until completely smooth, scraping down the sides as needed, then transfer the mixture to a fine-mesh sieve set over a bowl. Strain the mixture, extracting as much oil as possible. (You should have about 3 tablespoons/45 milliliters.) Discard the solids.

  3. Meanwhile, prepare a steamer for your carrots by heating water in your steamer or setting a colander over a large pot with a few inches of simmering water. Once ready, add the carrots and steam for 10 minutes, or until you can easily pierce the thick parts with a knife but the carrots are not overly soft. Transfer the carrots to a large, shallow dish along with the remaining 1 1/2 tablespoons/20 milliliters oil, plus 1/2 teaspoon salt and a good grind of pepper. Toss to combine.

  4. In a large bowl, whisk the honey, vinegar and a tiny pinch of salt. Set aside.

  5. Make the dukkah: Add all the dukkah ingredients to a food processor and pulse a few times until the nuts are roughly chopped. (You should have 1 scant cup.)

  6. Heat a well-oiled grill pan over high. Working in a few batches to avoid overcrowding, grill the carrots on all sides, about 6 minutes per batch. Transfer the grilled carrots to the bowl with the honey dressing, and toss gently to combine.

  7. Season the yogurt with 1/4 teaspoon salt, then spread it out on a large platter. Drizzle all over with the carrot-top oil then add the carrots, arranging them artfully so they’re all facing the same direction. Spoon a generous amount of dukkah on top and pass the rest.

  8. TIP: To make your own labneh, combine 2 3/4 cups/650 grams plain full-fat yogurt with 1/2 teaspoon kosher salt in a medium bowl. Transfer the mixture to a colander lined with cheesecloth or a clean tea towel, folding the overhang over the yogurt. Place the colander over a larger bowl and top with a couple cans or other heavy items to apply weight to the mixture. Refrigerate overnight or up to 48 hours, then squeeze out any excess liquid and transfer the labneh to a container.


CSA WEEK 3

- P I C K L I S T -

LETTUCE - GARLIC SCAPES - FRENCH BREAKFAST RADISHES - BEETS - ZUCCHINI - 

CILANTRO - CUCUMBER - TOMATO -  STRAWBERRIES - PYO PASS

9941E75F-FF9D-41D6-BD5F-F78EEE06FB69.JPG

YALL!  Berry season is still going strong and the berries still look damn good!  In your share this week, you get not only 1 quart of picked berries, but also a pass for you to pick 2 quarts of your own. For details of what field to go to, and times for picking head to our website www.edgewaterfarm.com and click on the PYO strawberry report on the top of the page.  

And now, let’s do as all farmers do, and talk about the weather.  Holy hell it’s HOT.  Your beets were picked and bunched on Monday in the humid heat of the day.  They held up beautifully in the beating sun.   In order to complete the harvest, it proved imperative to transcend the universe we were in (in the middle of a hot field) and head to an alternate reality where this heat was the norm (for example, a luxurious sauna at a luxurious spa).  Apparently, my mind can really take me to some fancy places when you have 215 bunches of beets to pick and it's over 90 degrees outside.  

On the topic of fancy spas… Are you aware that hot/cold therapy (immersing yourself in extreme heat followed by extreme cold) is considered by some the ultimate act of wellness?  If that is the case, then moving from field to pack shed at Edgewater Farm hosts the optimum experience in “self care.”  After drenching ourselves in sweat from the next-day-90-degree radish harvest, Kayleigh (the newest CSA crew recruit) went off to the cooler (kept at a low 40 degrees) to count zucchini.  She emerged an hour later, looking fresh faced, ready to go… but also potentially bordering on hypothermia.

Pure luxury at Spa Edgewater, now taking reservations.  

PRO TIPS:

The salad box:  My main recommendation to all of you for eating this week is the following: stay cool and eat salad.

SALAD IDEAS: 

  1. Add olive oil and vinegar and a spoon of honey to your garlic scape pesto, give it a shake, top your greens and call it salad dressing

  2. Cube and either roast/grill/boil your beets.  When cooked and cooled, toss them in lemon juice and olive oil.  Add feta cheese and herbs.  Mix it all together with your lettuce or devour on its own.

  3. Add the most beautiful Thinly sliced radishes to your salad greens of course!


GARLIC SCAPES… AGAIN?!?!  YES! 

This will be the very last garlic scape bunch for the duration of the year.  The harvest time for garlic scapes is so fleeting!  Therefore, their existence on our plates and in our bellies is too damn short.  This past weekend I made a ton of garlic scape pesto to freeze in an attempt to extend the season.  I even got WILD and added cilantro- the result was too good, and now my garlic scape pesto can not be without cilantro.  Anyhow, I would shoot y’all a recipe for garlic scapes, but I got to believe that by week 3 of a garlic scape heavy CSA month,  you must be pros. However, if you are still itching for inspo, and you are over grilling, pesto, and saute, try your hand at pickling.  

The very best sandwich to usher in the SEASON’S FIRST TOMATO 

Slice of tomato mayo fresh crusty bread fresh herbs of choice salt&pepper

Spread mayo on 2 pieces of crusty bread.  Add a big slice of tomato and sprinkle chopped fresh herbs, add salt and pepper to taste.  The end.  You’re welcome.

BEET TOPS!!!! 

These beet greens have the earthiest flavor of all green things.  Chop the tops off the beets (obviously save beet root for later), and cook the greens down like you would spinach or swiss chard. Hello creamed beet greens!

SERVINGS: 2 GENEROUSLY OR 4 PETITE-LY

  •  TIME: 25 MINUTES 

  • SOURCE: SMITTEN KITCHEN

  • 1 1/2 teaspoons kosher salt, plus more for pasta water, and to taste

  • 8 ounces (225 grams) spaghetti, cooked al dente

  • 1 cup (235 ml) pasta water, reserved

  • 1 1/4 pounds (570 grams) zucchini, trimmed, coarsely grated

  • 6 tablespoons (85 grams) unsalted butter

  • 5 garlic scapes, minced

  • 1/4 teaspoon red pepper flakes, or more to taste

  • 1/2 cup (45 grams) grated parmesan

  • Handful fresh basil leaves, cut into thin ribbons (cilantro would taste great here as well)

Boil your spaghetti in well-salted water until it’s 1 minute shy of fully cooked. Before you drain it, reserve 1 cup of the pasta cooking water and set it aside.

Melt butter in your empty pan over medium-high heat and add the garlic, stirring it into the butter for one minute before adding the zucchini, salt, and red pepper. Cook the zucchini, stirring from time to time, for 13 to 15 minutes. It will first let off a puddle liquid, the liquid will cook off, and the zucchini will become soft and concentrated. If the zucchini begins to brown, reduce the heat slightly. Stir frequently for 2 more minutes, chopping it down into smaller bits with the edge of your spoon or spatula, until it reaches an almost spreadable consistency.

Pour in 1/2 cup of the reserved pasta water and stir up anything stuck, then add drained pasta, and cook together for 2 minutes. Use tongs or two forks to pull up the zucchini butter sauce into the pasta strands, tossing frequently, and adding some or all of the remaining pasta water as needed to loosen. Toss in half of the parmesan and basil and mix, then transfer to a serving bowl. Finish with remaining parmesan and basil.


CSA WEEK 2

P I C K L I S T

strawberries - basil - kale - garlic scapes - cucumber - lettuce - scallion

IMG_7614.jpg

Before we get into the farm update, I need you to know that we are 3 weeks into picking berries and as a result of 3 weeks into 4:30am rise and shines, please forgive me for any and all grammatical errors, extreme run-on sentences, etc etc etc...

As for farm ongoings, all the plants have jumped including the weeds.  It’s an actual race every day to see who will win- the weeds or the crops.  Will the weeds reach above the crops, shading out/suffocating the plants? Or with the help of humans (with a hoe in hand, or cultivating with a tractor), will we make it in time to the field, clean up the rows, and allow space for the crops to put on size and flourish? In case anyone here is keeping tabs, I’m fairly certain the weeds are winning.  And for anyone who is keeping tabs on Edgewater from year to year- you know this is a constant summer solstice/berry-season struggle.  The weeds can really do a number on a field of beets, carrots, beans, etc, when you spend a large portion of your day with your eyes on strawberries. 

OK, OK, OK, enough about the weed saga!

 Let’s get into PICK YOUR OWN STRAWBERRIES.

PYO at Edgewater began 40ish years ago.  People would flood the fields, pick mountains of berries and return home to preserve- freeze or jam- for the winter months.  Certainly there is not a huge need for us to put up berries as there once was.  With the availability of fruit on grocery store shelves 12 months of the year, it's easy to take a pass on field picking.  BUT, if you catch a wild hair to pick, preserve, or even make a pie(!), I promise you- the experience will not disappoint.  You might be hot and tired by the end of the day with hands smelling and stained red of sweet berries,  but come January- you will be so pumped to pull from the freezer, or open that jar of jam bringing sunshine and Summer into the very darkest months.

AND NOW, THE PYO DEETS:

Field location for picking changes daily between Plainfield and Cornish!

Location #1: 99 RIVER ROAD/ PLAINFIELD NH (near our greenhouses)

Location #2: 949 NH ROUTE 12A/CORNISH NH (last year’s location, just South of the covered bridge on 12A)

TO KNOW WHICH FIELD IS OPEN TO PYO… CHECK THE WEBSITE - FACEBOOK - OR CALL BEFORE YOU COME: (603) 298-8391

The hours: 8-noon, 4-7pm (weather and crop permitting) The picking: excellent 

FIXED PRICES (CASH AND CHECK ONLY):  6 quart FLAT: $35 4 quart FLAT: $20  1 quart: $5.50

PRO TIPS:

Love garlic? You need to be cooking with garlic scapes.  BY CHRISTINA CHAEY

  1. Blitz some stalks into a garlicky pesto. If you're a hardcore garlic fan, leave out the basil altogether in favor of the scapes. Otherwise, substitute garlic scapes for up to half of your greens and proceed as usual. 

  2. Fold chopped and sautéed garlic scapes into frittatas or scrambled eggs.

  1. Chop garlic scapes into little coins and add to stir-fries and fried rice.

  1. Finely dice a couple of garlic scapes and mix into a vinaigrette. (They also make a tasty addition to green goddess dressing.)

  2. Throw whole scapes on the grill, just like you would make grilled scallions.

  3. Fold chopped scapes into a dip for grilled meat or roasted veg.

  1. Cut garlic scapes into 6-inch pieces and pickle them. (Think pickled green beans or thin kosher dill pickles.)

  2. Sauté scapes and use them as a pizza topping. Don't forget to save any leftover sautéeing oil for drizzling.

  3. Use the scapes whole in a warm-weather-friendly braise.

  4. Mix chopped scapes with a stick of butter to make a garlicky compound butter for grilled or pan-fried fish.

BY SUE LI 

The secret to layered, flaky, chewy-crunchy scallion pancakes? It’s all in the roll (and the spin, and the re-roll). Not to mention the low and slow crisping. Once you master this recipe, you might not ever order them at a restaurant again.

Ingredients  MAKES 8 SERVINGS

2½ cups all-purpose flour, plus more for surface

Kosher salt

1tablespoon toasted sesame oil

⅓ cup chicken fat, warmed, or vegetable oil

2 bunches scallions, thinly sliced (about 2 cups)

8 tablespoons vegetable oil, divided, plus more for brushing

SAUCE

3 tablespoons unseasoned rice vinegar

2 tablespoons soy sauce

1 teaspoon chili oil

½ teaspoon sugar

¼ teaspoon crushed red pepper flakes

Preparation: PANCAKES

Step 1

Whisk 2½ cups flour and 1 tsp. salt in a large bowl. Mix in sesame oil and 1 cup boiling water with a wooden spoon until a shaggy dough forms.

Step 2

Turn out dough onto a lightly floured surface and knead, adding flour as needed to prevent sticking, until dough is smooth, about 5 minutes. Cover; let rest at room temperature 1 hour.

Step 3

Divide dough into 8 pieces. Working with one at a time, roll out on a lightly floured work surface as thin as possible (each should be approximately 10" in diameter). Brush about 2 tsp. chicken fat on dough and top with about ¼ cup scallions; season with salt. Roll dough away from you (like a jelly roll) into a thin cylinder, then, starting at 1 end, wind roll onto itself to create a coil (like a cinnamon roll). Cover and repeat with remaining dough. Let rest at room temperature 15 minutes.

Step 4

Working with 1 coil at a time, roll out on a lightly floured surface to a 5" round (keep other coils covered). Repeat with remaining dough and stack as you go, separating with parchment or lightly greased foil brushed with vegetable oil.

Step 5

Heat 1 Tbsp. vegetable oil in a medium skillet over medium-low. Working with one at a time, cook pancake, turning frequently to prevent scallions from burning, until golden brown and crisp on both sides and cooked through, 8–10 minutes. Transfer pancakes to a wire rack and let rest about 5 minutes before cutting into wedges.

SAUCE:  Whisk vinegar, soy sauce, chili oil, sugar, and red pepper flakes in a small bowl until sugar is dissolved. Serve alongside pancakes for dipping.

CSA WEEK 1

-P I C K L I S T -

SPINACH - GARLIC SCAPES - BOK CHOY - SCALLIONS - RHUBARB - BASIL - CUCUMBER - STRAWBERRIES

WEEK 1.JPG

To those that are new to this eating/farming journey, welcome! And for those well seasoned CSAers, I am so pumped to have you back because hot damn it feels good to be picking food again for all of you!  

This June feels more welcomed than any June I have ever known.  With the emergence of the garlic scapes from the garlic crop and the ripening from white to red of the strawberry fields, we too are emerging and I am reaching for the sun!  And, like a strawberry, with every sunny day, I too am turning white to red. (Who’s got my sunscreen?)

ALRIGHT LET’S GET INTO THOSE GARLIC SCAPES:

What are they?  For you fresh CSA babes, the garlic scape might be a mystery crop, but let me tell you there is magic in those green twisty wands.  Garlic scapes grow out of the garlic plant.  They are the eventual flower that the garlic would naturally produce.  However, we cut them back in order to make a more robust garlic bulb.  Plants use a ton of energy to make flowers.  When you cut back your flowers, or prune your trees, it might feel disheartening at first (if you know you know).  For example, in my own garden, I go through each of the early blossoms and snip back the flowers. We try to do this in our cut flower field as well.  This encourages all that good energy that goes into producing flowers to be redirected into the foliage of the plants and its roots, encouraging a stronger, more productive plant over the growing season.  However, unlike pruning your tomato plants or apple trees, we get to eat the ‘cut back’ flower right now.  For all you medicinal foodies, there are real benefits to eating garlic scapes: immune system support, reduce inflammation, vitamin C, antioxidant properties, etc. The garlic scape is a more mild garlic that can be chopped fresh, fried on the pan, grilled with olive oil & salt or pestoed.  I prefer pesto- see the PRO-TIPS section for more on this.   

AND AS FOR STRAWBERRIES!  We are one week into picking berries and the fruit is coming on nicely.  The initial heat gave us a scare.  Watching all the varieties ripen up at the same time was a little unnerving as too much fruit at one time is completely overwhelming for the farmer and the plant.  Thankfully, this cool weather came to town and allowed us to take some deep breaths as we gear up for the next month of early mornings, butts up in the air, and flats full of berries.  

PRO TIPS:

WASH YOUR SPINACH!  Really and truly, give it one more rinse before you eat in order to take it to the next level of grit free greens.  

THE FOLLOWING IS A REPEAT CSA RECIPE FROM PAST YEARS, I'M SORRY I CANT HELP MYSELF THE END PRODUCT IS JUST SO DANG GOOD…

Make the following recipe!  It’s entirely mandatory!  Bonus, this stuff freezes beautifully, so don’t feel committed to eating it all right away.  This is one of our staples our family makes a ton of and keeps in our chest freezer to enjoy all winter long.  The recipe says eat with spaghetti or (crusty) bread, but don’t stop there- slab it on your eggs, use it for a salad dressing base, dollop it in your winter soups, etc…  And if you do make a ton to freeze, make sure that however you are packaging it, leave room at the top of the container for the pesto to expand.  (we pack ours in mason jars, and have run into many-a-broken pesto filled jar.  (1“ of space at the top should suffice).  

YIELD About 1 cup recipe from the NYTimes

The star of this pesto is the garlic plant’s under-appreciated second offering: the fleeting garlic scape. The ingredients are straightforward except for the substitution of sunflower seeds for pine nuts. The seeds are a fraction of the cost and do the job just as well. A food processor is a must for this recipe. For pesto, ingredient order matters. Start with the scapes and process for about 30 seconds. Add the seeds until they are broken down and mixed well with the scapes. Scrape the sides of the bowl with a rubber spatula for wandering bits. Next, pour in the olive oil. If you have Parmesan cheese in chunks, add it now, but if it is grated, wait until the scapes and seeds smooth out. If you’re serving right away, add the basil and lemon juice. If not, hold back on the basil for now — otherwise the pesto will lose its vibrant color. Add generously to cooked spaghetti or spread on crusty bread.

BOK CHOY

I am a huge fan of bok choy. For us, It's one of the first Summer greens that grows nicely in what appears to be all conditions.  We obviously add it to stir-fries, ramen, fried rice, kimchi etc… But we also chop and use it as a sub for any early green.  For example, it goes great in eggs- chopped thin and eaten fresh in tacos, etc…  

by smittenkitchen!

JENNYS NOTE: At Least one point in the season- typically towards the beginning I have fantasies of making these muffins, only a handful of times has that fantasy come true… but these are perfect and easy enough.  I encourage all to make extra and drop them by the strawberry fields on any given morning, the entire crew will thank you.  (lol, jkjkjk, but also, not jk ya know?

 Streusel

1/4 cup (31 grams) all-purpose flour

1/4 cup (28 grams) white whole wheat flour

1 tablespoon (13 grams) granulated sugar

3 tablespoons (38 grams) light or dark brown sugar

1/4 teaspoon ground cinnamon

Pinch of nutmeg

Pinch of salt

3 tablespoons (42 grams) unsalted butter, melted


Muffin

1 large egg

1/4 cup (50 grams) light or dark brown sugar

3 tablespoons (38 grams) granulated sugar

5 tablespoons (71 grams) unsalted butter, melted and cooled to lukewarm

3/4 cup (177 ml) sour cream

1 cup (approx. 120 grams) white whole wheat flour or whole wheat pastry flour (see Note)

1/2 cup (63 grams) all-purpose flour

1 1/2 teaspoon baking powder

1/4 teaspoon baking soda

1/4 teaspoon salt

1 cup diced rhubarb, in 1/2-inch pieces (from about 6 to 8 ounces of stalks)

Preheat oven to 375°F. Butter 12 muffin cups.

Make streusel: In a small dish, stir together flours, sugars, spices and salt. Stir in butter until crumbly. Set aside.

Make muffins: Whisk egg in the bottom of a large bowl with both sugars. Whisk in butter, then sour cream. In a separate bowl, mix together flours, baking powder, baking soda and salt and stir them into the sour cream mixture, mixing until just combined and still a bit lumpy. Fold in rhubarb and 1/3 (feel free to eyeball this) of the streusel mixture.


Divide batter among prepared muffin cups. Sprinkle each muffin with remaining streusel, then use a spoon to gently press the crumbs into the batter so that they adhere. Bake for 15 to 20 minutes, until tops are golden and a tester inserted into the center of muffins comes out clean. Rest muffins in pan on cooling rack for two minutes, then remove muffins from tin to cool them completely.

FALL CSA WEEK 7

- P I C K L I S T -

BUTTERNUT SQUASH - RED KURI SQUASH - CELERY - CELERIAC - KALE - BOK CHOY - FINGERLING POTATOES - WATERMELON RADISH - ONIONS - PARSLEY - CARROTS - PURPLE TOP TURNIPS - BOK CHOY - DILL - ROSEMARY - CAYENNE PEPPER - SPINACH

93F47429-C6EA-47F7-B254-352DD7E57D1B.JPG

CSAers- we did it!  These past 7 weeks, on top of the 17 weeks prior (Summer CSA) mark the end of the 2020 growing season.  Making it through this particular season feels like a wild accomplishment.  In the Spring, we as a global community were faced with the pandemic.  On the farm, none of us knew how to respond, and the rules felt blurry.  We established protocols that were changed maybe 15 times… This thing- farming- that we’ve all been working at for sometime now, felt more important than ever.  People need access to food, we grow food, it should stop there, but it didn’t.  We had to figure out the best practices to get the crops to you in a manner that keeps the community going, and keeps us all healthy.  Again, this should seem simple- but it’s not.  We worked in a tight bubble all Summer, with our field crew as our family.  Driving together in cars, working together in packsheds, and taking deep breaths outside when in the fields working.  Thank the actual heavens it all worked out. 

(Quick aside- this note just became cathartic- I can actually feel my shoulders drop as I write this, phew).

AND the CSA!!!  Ahhh! Yesssss!!!  This and our wholesale were the only aspects of the farm that required very little modification to become COVID appropriate.  The weekly system of harvesting a diversified list of crops for a large group, and then packaging into separate containers for pick-up, is already, for the most part, a contactless sport.  It felt like a huge relief to already have the CSA in place with years of practice prior to the start of the season.  However something was always missing, and that something was the actual in-person community meetups either at the farmstand, or in the field for gleanings.  To make up for that missed contact, I emailed you all once a week as reminders for pick up and utilized instagram stories.  This was done somewhat for efficiency (come get your box so we have less to clean up at the end of the day!) but mostly just to connect.  Because otherwise, it's just a box of vegetables. Now you know it’s so much more than that.  It’s a wholly sincere box of food and connection from me and the crew, to you.  

Also, let it be known, that I can not express how good it feels to have such a positive and flexible group to grow food for.  Y’all made this season more than just possible, you made it actually sparkle (Not kidding here, I’m absolutely putting a little nod to the 2020 CSA participants in my memory bank- yall are the best). THANKYOU.  

And to wrap up this note, for those that might go into mourning next week when there is no CSA pick up (me) here is a list of places you can STILL purchase the food we grow:

  • All of the COOP foodstores (Lebanon, WRJ, Hanover)

  • Brownsville Butcher and Pantry

  • Kearsarge food hub

  • Warner public market

And as for Winter plans and projects: mulch strawberries, continue the storage crop pack out for wholesale, complete seed orders, watch allllllllll the movies, pretend I’m a fiber artist, and come January 2nd we will open up our online shop for CSA sign ups for the 2021 growing season- stay tuned people! (and stay safe!)

HOT TIPS:  

CELERIAC:  For those new to celeriac, welcome to the weird and wonderful vegetable party. Here is what you need to know:

This vegetable takes a loooooong time to grow. But it’s worth it.  The root, when paired with equal parts potatoes makes a great mash.  Add a pinch of lemon juice to keep the color a bright white.  Also, like all root vegetables, celeriac roasts beautifully.  

Seasons well with: walnuts, lemons, thyme, honey, celery seeds, mustard, apples, lime juice, vinegar

Also, great fresh, see below recipe: 

... 4 SERVINGS

⅓ cup olive oil

1 teaspoon finely grated lemon zest

3 tablespoons fresh lemon juice

Kosher salt, freshly ground pepper

½ cup chopped fresh parsley

¼ cup capers

½ medium celery root (celeriac), peeled, thinly sliced on a mandoline

5 celery stalks, thinly sliced into long ribbons on a mandoline

Whisk oil, lemon zest, and lemon juice in a large bowl; season with salt and pepper. Stir in parsley and capers.

Add celery root and celery to dressing; toss to coat. Let sit 5 minutes before serving.

Harvest vegetable mash is a flavourful alternative to mashed potatoes. Featuring roasted garlic, fresh horseradish, and fried dukkah to top.

Author: Laura Wright  firstmess.com 

DUKKAH:

  • 1 cup raw pumpkin seeds

  • 1 ½ teaspoons coriander seeds

  • 1 ½ teaspoons cumin seeds

  • 1 teaspoon sesame seeds

  • 1 teaspoon nigella seeds (optional)

  • chili flakes, to taste

  • big pinch of flaky sea salt

HARVEST VEGETABLE MASH:

  • 1 medium celery root (1 ¼ lbs)

  • 2 russet baking potatoes (1 ¾ lbs)

  • Carrots (¾ lb) (original recipe calls for parsnips, but we dont have parsnips, sub in carrots!)

  • 1 head roasted garlic (see notes)

  • 2 inches horseradish root, finely grated (JENNY’S NOTE: ugggh, never harvested our horseradish, this might be worth sourcing to complete this recipe, but perhaps you could omit altogether) 

  • ¾ cup creamer (non dairy creamer for the lactose adverse)

  • ¼ cup olive oil, divided

  • sea salt & ground black pepper, to taste

INSTRUCTIONS

  1. Make the dukkah: in a food processor, combine the pumpkin seeds, coriander, and cumin. Pulse the mixture until pumpkin seeds are finely chopped. Transfer mixture to a small bowl and stir in the sesame seeds, nigella seeds, chili flakes, and flaky salt. Set aside.

  2. Preheat the oven to 350°F. Line a baking sheet with parchment or a Silpat.

  3. Peel the celery root, potatoes, and carrots. Chop the celery root and potatoes into 1-inch cubes and transfer to a large pot. Chop the carrots into ½-inch pieces and transfer to the pot as well. Cover the vegetables with water and add 1 tablespoon of salt. Cover the pot and bring the vegetables to a boil. Boil the vegetables until all varieties are VERY tender when pricked with the tip of a paring knife, about 12-14 minutes.

  4. Drain the vegetables and transfer to the prepared baking sheet. Arrange vegetables in a single layer and place in the oven for 5 minutes, or until the surface appears dried out.

  5. Squeeze the roasted garlic out into an upright blender. Add the horseradish, creamer, and 2 tablespoons of the olive oil. Blend this mixture on high until completely smooth. Transfer this garlicky cream to a small saucepan and bring to a strong simmer.

  6. Place the dry vegetables back in the big pot and mash them up a bit by hand to break up the big pieces. Then, add all of the garlicky cream to the pot along with a lot of salt and pepper. Keep mashing until vegetables are smooth and slightly fluffy. Keep warm.

  7. Set a small frying pan over medium-high heat. Add the remaining olive oil to the pan. Once hot, add ¼ cup of the dukkah to the pan and stir constantly until fragrant and spices appear golden brown and toasted, about 3 minutes. Spoon fried dukkah and flavoured oil over the harvest vegetable mash. Serve immediately!

NOTES

  • This recipe makes extra dukkah. It’s amazing on top of creamy pureed soups and salads, avocado toast, on dips with a swoop of olive oil, or sopped up with fresh bread and olive oil.

  • The roasted garlic and dukkah can be made 5 days in advance and stored in the fridge.


Watermelon radish

Unfortunately, half the crop got eaten by wireworms!  I wish I could have offered you heaps more- but this is all we got.  However, the color here is so vibrant, that even just using it as a garnish will be enough to blow the socks off your zoomgiving guests.  Use a knife to peel off the tough outer greenish-white layer, and behold the most beautiful hot pink color.  Slice thick or thin and eat fresh. 


FALL CSA WEEK 6

PICK-LIST

SWEET POTATOES - KALE - LETTUCE - CURLY PARSLEY - DELICATA WINTER SQUASH - BROCCOLI - SAVOY CABBAGE - ORNAMENTAL CORN - FENNEL - BOK CHOY - ROMANESCO - RED POTATOES

7F515ADD-0E6D-40B6-B0F8-C89A341C9D10.jpg

Ok, now is the time of year where my emotions can really get the best of me and I become very sentimental.  This week, the better half of our field crew heads home to Jamaica, and it always makes me a little weepy.  Roy, Strong, Ramone, Jasper, and Garnet begin to work with us seasonally starting in May.  Their arrival in the Spring marks the beginning of our full bore growing season.  Together, we plant, weed, pick, and pack, clean, etc… truly embracing the adage, many hands make light work.  And if I knew an old adage about life is better working with people you love, trust, and laugh with, I’d use it here too.  

For me personally, this crew makes it possible to farm and parent at the same time.  Both the fields and the kiddos demand love and attention.  So while Roy, Strong, Ramone, Jasper, and Garnet tend more towards tasks that go into raising good crops, Ray and I (and full disclosure, Grannie Annie (Anne Sprague)) tend more towards the tasks that go into raising (good?) kids.  

Also, if you don’t already know, Roy Mitchell in particular, is key in the success of our CSA.  He shows up every single Wednesday to assist in the CSA box pack-out.  We work together from the start of CSA harvest on Monday to pick-up on Wednesday.  After working together for the past 12 years we’ve got our systems in place with potentially too many jokes thrown in along the way.  Later today, Roy and I will pack his last CSA box for the year with our Wednesday radio station of choice (97.5 fm) to carry us through.  

But it’s mid-November now, and the temps have certainly dropped!  By Thursday night these guys will be back in the tropics quarantining until they can step foot into their own homes and reunite with their own families- giving hugs, eating good goat curry and catching up on life.  Of course traveling during this time (hello pandemic) feels completely complicated and nothing is without risk, but we are taking all the precautions that we can on our end to get them back home safely.  If all goes well- and I have to believe it will- the next 5 or 6 months will move swiftly through winter, into the next growing season and we will all be back in the fields in no time, planting onions, catching up, snacking on donuts, and preparing for the 2021 harvest season.  

LASTLY BEFORE WE GET INTO RECIPES, HOT TIPS, ETC…. 

The final CSA pick up is next week on TUESDAY (this timing should allow for proper Thanksgiving meal prep for all)

HOT TIPS:  

KALE SALAD WITH ROASTED SQUASH AND FENNEL

FROM START SIMPLE

Copyright © 2020 by Lukas Volger. Published by Harper Wave, an imprint of HarperCollins Publishers. 

The dressing - a mix of maple syrup, lemon juice, and olive oil, plus an optional jolt of ginger- could make anything taste good, and the salad, with its autumnal profile, works just as well in holiday menus as it does in packed weekday lunches… Add some crumbled feta if you’d like a tangy creamy element.

2 cups winter squash cut into bite size pieces

1 to 1 ½ tablespoons maple syrup or honey

3 tablespoons olive oil, divided

2 teaspoons finely grated ginger (optional)

Salt & pepper

1 small fennel, cored

2 tablespoons fresh lemon juice

1 large bunch of kale (stemmed and torn into bite size pieces

¼ cup crumbled feta cheese (optional)

Preheat the oven to 425.  Spread the squash on a baking sheet, then toss with 1 ½ tablespoons of the olive oil and sprinkle with a big pinch of salt and pepper.  Roast until tender, 15-20 minutes, stirring once or twice.  Cool.

Whisk together the remaining1 ½ tablespoons of olive oil, the lemon juice, maple syrup or honey, and ginger, if using, in a serving bowl.  Cut the fennel into thinnest-possible shavings, preferable using a mandoline or, if not, a very sharp knife.  Add the fennel and squash to the bowl with the dressing and stir to coat.  Let stand for about 5 minutes, which will soften up the fennel, then add the kale and toss with your hands.  Top with cheese if using.  

 BAKED SWEET POTATO CHIPS

FROM START SIMPLE

Copyright © 2020 by Lukas Volger. Published by Harper Wave, an imprint of HarperCollins Publishers. 

 2 medium sweet potatoes

1 teaspoon flaky sea salt

2 tablespoons olive oil

pinch crushed red pepper flakes

Zest of 1 lime 

Preheat the oven to 425.  

Using a mandoline, or if you don’t have one, a chef’s knife, slice the sweet potatoes into rounds about ¼ inch thick.  Place in a large bowl, add the oil, and stir to coat evenly.  Arrange on a baking sheet in the best single layer you can manage, then transfer to the oven and bake for 10 minutes.  Stir and flip, then return to the overn and bake for 5 to 10 minutes more, until most of the chips are crisp and browned (some take on some black spots; thats fine!).  Watch carefully towards the end, as they darken quickly.  

 In a small bowl, mix together the salt and red pepper flakes.  Sprinkle over the sweet potatoes chips and zest lime over everything.  Serve while they’re still warm.  These are best when eaten within a few hours.  

 roasted broccoli/romanesco 

FROM START SIMPLE

Copyright © 2020 by Lukas Volger. Published by Harper Wave, an imprint of HarperCollins Publishers.

JENNY’S NOTE:  I don’t know why it took me so long in life to cook broccoli in the oven (vs. steaming).  I feel like I’ve been shown the light, and I am so excited to grow old and spend the next 37 years (more? less?) roasting broccoli.  It’s Perfect.  

 Broccoli/Romanesco

freshly ground black pepper

olive oil

Salt

Preheat the oven to 400*

Working close to the stem, cut or snap off large bunches of florets of broccoli or romanesco.  Depending on their size, halve or quarter them so that you’ve got a flat surface or two.  For the broccoli, use a vegetable peeler or baring knife to remove the thick fibrous skin around the stem, then cut the peeled stem into pieces the same thickness as the florets.

 Divide the vegetable between the two baking sheets, then drizzle generously with olive oil and sprinkle with salt and black pepper.  Toss to evenly coat, then transfer to the oven and roast until tender and caramelized in parts, 20 to 30 minutes, stirring and rotating the pans once halfway through.  

 Jenny’s note on start simple by lukas volger:  

I can not stress enough how helpful this book has been when it comes to easy GOOD meals.  And it highlights all the food that we tend to have so much of this time of year: squash, sweet potatoes, kale, and cabbage.  This would be a great addition to your cookbook collection to get you through the year.  Nope this is not a paid advertisement- I'm just a lover of this book and it complements a CSA season all too well.  I also feel the same way about TENDER by Nigel Slater.  If anyone needs any more cook recs, reach out, apparently I’ve just deemed myself an expert.    


BOK CHOY: 

I am a forever lover of this crisp asian green.  Goes great in stir fries, soups, salads, etc.. 

LETTUCE:

You might come across some browning on the bottom (it was picked on Saturday due to cold nights ahead). This lettuce will continue to stay fresh for a while, just cut back the bottom butt and outer leaves if need be.

FALL CSA WEEK 5

p i c k l i s t

LETTUCE - SPINACH - LEEKS - CILANTRO - RADISHES - POTATOES -

HEIRLOOM TOMATOES - BRUSSEL SPROUTS - CARROTS - ONIONS

317B7B86-E69A-40D1-B842-57EA2E588EFE.jpg

Oh my goodness yall, WHAT A WEEK.  Now that’s been addressed, let me tell you what happens when 2 people and one dog are out of work due to injuries- the WHOLE FARM RALLIES and SUPPORTS!  I am out of commission for the next few days due to a knee injury, Pooh (my father in law/farm owner/greenhouse guru/tractor driver/manhattan maker/etc…) is out of commission due to shoulder surgery, and our dog (resident varmint hunter/seat warmer) just got her toe nail removed.  We are a ragged bunch.  

BUT THIS is what makes our farm a family farm.  These moments of support really strengthen my appreciation and love of this life I chose.  Am I bummed that I missed out on the most glorious days in history for harvesting vegetables in the Northeast in November? Hard yes.*  BUT I am so grateful to our family and field crew that shifted their schedules and priorities to pick the spinach, bag the potatoes, feed the kids, bathe the kids, play with the kids, bunch the cilantro, pick the heirloom tomatoes, pack the boxes, etc… 

So cheers to this family farm for coming through without even thinking twice about picking up my slack, Pooh’s slack, the dog’s slack.  

Also noteworthy, something like this tends to happen towards the end of every season.  One or more of us on the farm has some quiet injury that sneaks up, commands our attention and insists we slow down.  We’ve learned to listen when our bodies are speaking (sometimes shouting).  And If you need me or Pooh or Sugar the dog for the next few days, you can find us on a couch somewhere either in direct sunlight or close-to it, deep diving into all the questions we meant to ask the internet all summer long, painting nails, reading books, taking naps, and being ok with being still.   

*The sunshine and warmth right now is unbelievable.  It’s like the last big warm hug before we all go into winter hibernation.

HOT TIPS:  

SEASONAL GREENS SOUP

from another staple cookbook in my kitchen, The First Forty Days

 ...By simmering and liquifying lots of greens at once, you can consume a gardenful of greens in one brightly colored and very easily digestible bowl.  Quinoa boosts the soup by adding texture, protein, and a pop of contrasting color.  

 JENNYS NOTE:  This soup is better than you can even imagine.  Earthy and heartwarming, and every bite feels like you’re giving your body a gift of nourishment (some of you may find those words a little much but I can not be stopped- the soup is just that simple, and just that good).

3 leeks, white parts only, cut crosswise into thin slices

½ cup peeled and roughly chopped onion

3 medium parsnips (i use carrots!) peeled and roughly chopped

3 tablespoons olive or coconut oil

2 qts vegetable broth

½ teaspoon sea salt

1 cup quinoa

5 cups loosely packed spinach

2 tablespoons soy sauce, tamari, or bragg liquid aminos to taste

2 tablespoons nutritional yeast (optional)

In a large pot over medium-high heat, saute the leeks, onions, and parsnips (or carrots) in the oil until lightly browned.  Add the broth, reduce the heat to medium, cover, and let it simmer for about 30 minutes, or until the parsnips (carrots) are soft.  

Meanwhile, in a small pot, bring 2 cups water and the salt to a gentle boil.  Add the quinoa, reduce the heat, and simmer, covered, for 15 minutes, or until the quinoa is fluffy and tender and has unfurled (opened) slightly.  

When the soup has finished cooking, remove it from the heat to cool down a bit.  Working in batches, transfer the warm soup to a blender, along with the fresh spinach and blend until everything is incorporated into a vibrant green puree (or use a hand blender).

Return to the pot, stir in the quinoa, and season with soy sauce and nutritional yeast, if using.  

Warm up the soup over low heat before serving.  Store leftovers in the fridge for upto 5 days, or freeze!

JENBOB’S Roasted potatoes:

A quick trick to make your roasted potatoes even better.  

  • Begin by chopping into the size you like, and parboil for 5 minutes.  

  • Once the potatoes are slightly softer to the fork poke, drain water

  • Toss potatoes in olive oil, season with salt and whatever else you like

  • lay potatoes in single layer on to greased pan and roast until golden and crispy, as for temperature- it's your call.  If you have time, do a slower roast at 350, BUT if you need a quicker bite, run your oven at 425 and check it every 15-20 minutes for burning.


Tortilla espanolla (bonappetit.com)

JENNY’S NOTE:  I just remembered this bomb dish that we ate all the time when Ray, Hobbes and I Winter tripped to Spain a few years back when (Hobbes was 2!).  Since then, I’ve made this dish a few times for the fam with a mostly successful flip relate- but the base is potatoes, eggs, salt, olive oil- therefore this recipe is an automatic hit.  Eat on a bed of salad greens!  Garnish with cilantro or/and the kimchi you may or may not have made last week!  So. Good.  

Here’s your chance to master one of Spain’s classic tapas: tortilla española. The key is to leave the eggs slightly undercooked; that’s what gives this a custardy (not bouncy) texture.

Ingredients

8 SERVINGS

1 tablespoon, plus 2 cups olive oil

1 medium yellow onion, thinly sliced

Kosher salt

2 medium waxy potatoes (about ¾ lb.), peeled, cut into ¾” pieces

8 large eggs

Preparation

Step 1

Heat 1 Tbsp. oil in a large skillet over medium heat. Add onion, season with salt, and cook, stirring occasionally, until softened and dark brown, 35–40 minutes. Let cool slightly.

Step 2

Meanwhile, heat potatoes and remaining 2 cups oil in a medium saucepan over medium-high heat until oil around potatoes begins to bubble; reduce heat to medium and cook until potatoes are tender but have not taken on any color, 10–12 minutes. Drain potatoes, reserving oil. Season potatoes with salt and let cool slightly.

Step 3

Combine eggs, onion, potatoes, and ¼ cup reserved potato cooking oil in a large bowl and gently beat with a fork.

Step 4

Heat 3 Tbsp. reserved potato cooking oil in a 10” nonstick skillet over medium heat (reserve remaining oil for another use). Add egg mixture and cook, lifting at edge and tilting skillet to let uncooked egg run underneath, until bottom and edge of tortilla are set but center is still wet.

Step 5

Set a large plate on top of skillet. Swiftly invert tortilla onto plate, (THIS IS THE FLIP!!) then slide back into skillet, cooked side up. Cook until center is just set, about 2 minutes longer. Cut into wedges.


POTATO LEEK SOUP:

CLEARLY THIS IS THE WEEK TO MAKE POTATO LEEK SOUP, POTATO LEEK GALETTE, ETC… Give it a google, let me know how it goes.  I mean it!


FALL CSA WEEK 4

- p i c k l i s t -

BUTTERNUT SQUASH - NAPA CABBAGE - GREEN CABBAGE - PURPLE TOP TURNIPS - CARROTS - 

HOT PEPPER - FENNEL - LETTUCE - RED ONIONS - POTATOES - PARSLEY 

149A99C8-6F86-4840-8EE2-DCE6F7D76C19.JPG
506C14D8-90EF-49F3-B378-4B7651804AB9.JPG
F4F8BD3F-F726-4C1D-9D3E-EB894A076E34.JPG

There is very little for me to report on right now other than, hello snow.  The headlines are a buzz with election day predictions (written on TUESDAY).  So to get through the next 48 hours, I will put my head towards the ground, pick vegetables, wash vegetables, and pack them into boxes because no matter what the results of this very important election are, our job at Edgewater is to grow food and nurture the land.  So that is what we will do and keep on doing forever and ever, amen (this sentiment is really turning out to be my 2020 mantra).  ALSO, to complement the stress picking happening today, I offer so many recipes for stress cooking to get you through the week!  PRO-TIP FOR GUT HEALTH, ferment all the veggies.  

HOT TIPS:  

Ashkenazi kimchi 

From the (best) cookbook that uplifts my heritage, 

THE GEFILTE MANIFESTO by Jeffrey Yoskowitz and Liz Alpern

JENNY’S NOTE: THIS RECIPE IS EXCELLENT.  This ferment, inspired by Korea and Eastern Europe, presents a very delicious kimchi that my WHOLE FAMILY (kiddos and all) love.  We put on/in everything (soups, sandwiches, eggs, tacos, etc…) 

1 pound green cabbage, outer leaves removed, cored and thinly shredded

1 pound napa cabbage, outer leaves removed, cored and coarsely chopped

1 pound turnips, halved and cut into ¼ inch thick half moons

1 pound carrots cut into ¼ inch thick rounds

2 scallions, sliced

8 cups water

½ cup kosher salt

FOR THE PASTE

1 medium red onion, quartered

4 garlic cloves

2 chile peppers, fresh or dried, mild to hot based on your preference

1 tablespoon hot hungarian paprika (optional)

3 tablespoons grated peeled fresh ginger

  1. Place the prepared vegetables in a large bowl.  In a separate container, combine the water and salt and stir until the salt has dissolved.  Pour the saltwater brine over the vegetables, weigh down the vegetables to ensure that they stay below the brine, and let sit at room temperature for 1.5 hours.

  2. Drain the vegetables, reserving 1 cup of brine, and return them to the bowl.

  3. TO MAKE THE PASTE: In a food processor, combine all the paste ingredients and process for about 15 seconds, or until the ingredients break down to form a rough paste.  If you don’t have a food processor, you can do this using mortar and pestle.

  4. Using a wooden spoon or your hands, coat the vegetables with the paste.  Once well coated, pack the vegetables very tightly into two quart size jars or a small ceramic croc so that the brine rises to cover them. If there is not enough liquid in the jar to keep the vegetables submerged, pour in enough of the reserved brine to cover them.

  5. CREATE A SEAL: If fermenting in a crock use a plate or wooden board to force the vegetables beneath the brine.  Top with a clean glass growler or jar filled with water to ensure that the weight applies pressure on the vegetables keeping them submerged.  If fermenting in a jar, use a smaller jar filled with water to do the same.  Cover with a towel to keep out dust and bugs.  Let the kimchi ferment on our kitchen counter, out of direct sunlight, for 4 to 7 days, or longer to taste.  Fermentation times vary significantly with temperature, so it is critical to taste the kimchi each day after 2 days.  When the kimchi reaches the desired taste, cover the jar and refrigerate.  Kimchi will remain delicious in your fridge for up to 6 months.  

ALSO, SAUERRUBEN:

A purely turnip ferment that is so so good and really plays up the horseradish notes inherent of the turnip

2 pounds whole turnips

1 tablespoon plus 1 teaspoon kosher salt

  1. Using the medium hole in box grater or the shredder on a food processor, shred the turnips, mixing the shreds with your hands to coat evenly with salt. Continue to mix with your hands for a few minutes more, pressing down occasionally to release more liquid. Take a fistful of shredded turnips and squeeze- if liquid oozes out, then you’re ready.

  2. Place the turnips in a quart sized jar, being careful not to lose any of the liquid. (A canning funnel helps avoid spills.) Create a seal using a smaller jar that fits into the mouth of the quart size jar, fill it with water, and place on top of turnips to force them beneath the brine and to ensure that the weight applies pressure, keeping the turnip shreds submerged. Cover with a towel to keep out dust and bugs. Let the turnips sit at room temperature for 3 to 6 days. Taste after 3 days to see if it’s sour enough for your liking. If not, reseal and taste daily.

  3. Once the desired flavor is reached, cover the jar and refrigerate. Note that the top layer may dry out. If this happens, just scrape it off. Sauerruben will remain delicious in the refrigerator for up to 3 months.

  • 1 pound small turnips, trimmed, scrubbed, cut into 1” wedges 2 tablespoons white miso

  • 2 tablespoons unsalted butter 1 teaspoon sugar

  • Kosher salt and freshly ground black pepper 2 tablespoons fresh lemon juice

  • Combine turnips, miso, butter, and sugar in a medium skillet, then add water just to cover vegetables. Season with salt and pepper.

  • Bring to a boil over medium-high heat and cook turnips, turning occasionally, until they are tender and liquid is evaporated, 15–20 minutes.

  • Once all the liquid has cooked off, keep cooking turnips, tossing occasionally, until they are golden brown and caramelized and the sauce thickens and glazes the vegetables, about 5 minutes longer.

  • Add lemon juice and a splash of water to pan and swirl to coat turnips. Season with salt and pepper.

LENTIL, CABBAGE, AND FETA SALAD WITH FRIZZLED ONIONS BY LUKAS VOLGER from his book start simple

Copyright © 2020 by Lukas Volger. Published by Harper Wave, an imprint of HarperCollins Publishers. Reprinted by permission

JENNY’S NOTE: This was the salad of the summer at our house!!  We made a mess of it on Fridays and would eat it for 3 days after.  Also, since Summer returns on Thursday (HALLELUJAH 60 DEGREES!!) I suggest you make, eat, and pretend we live in the tropics as long as possible until the temps drop and seasonal shifts happen.  

½ cup brown, black or dark green lentils

Salt

½ medium white or yellow onion

Olive oil

5 cups sliced cabbage

¼ teaspoon sugar

2 tablespoons red or white wine vinegar

2 teaspoons dijon mustard

¼ teaspoon honey

½ cup crumbled feta cheese

1.2 cup coarsely chopped toasted almonds

½ cup parsley leaves or dill fronds

 Combine the lentils with 1 cup water and ½ teaspoon salt in a small saucepan.  Bring to a simmer, cover, and cook until tender, 12 to 18 minutes, depending on which lentils you use.  Drain off and liquid left in the pan and allow to cool.

Meanwhile, slice the onion into paper-thin wasps, preferably using a mandolin, or working carefully with a chef’s knife.  Warm about ¼ inch of the olive oil in a small skillet over medium heat.  Dip a piece of onion into it to ensure it’s properly hot- it should sizzle immediately- then add all the onions.  Cook, stirring often with a fork, until they get crispy and turn a reddish-brown color, 10 to 20 minutes. Watch carefully for the final few minutes, as they burn easily.  Use a slotted spoon to transfer them to a paper towel- lined plate and sprinkle with salt.  SAVE THE OIL!

When the oil has cooled until it’s safe to handle, strain it through a fine mesh sieve or coffee filter to remove all solids into a glass jar (I use a 3-inch strainer for this task).

Toss the cabbage, ½ teaspoon of salt, and the sugar in a colander and let soften for 15 to 30 minutes, then gently press with a spatula to drain off excess liquid.  

Combine the vinegar, mustard, and honey in a jar, along with the 3 tablespoons of the cooled onion-cooking oil.  Shake to emulsify.  

Fold the cabbage, lentils, cheese, almonds, and parsley leaves with most of the dressing in a serving bowl.  Taste and add more dressing if needed.  Pile the frizzled onions on top, tossing them into the salad at the table it’s being served.  

Fennel gives this salad it's signature crunch and lends a sweetness to balance the red onions and parsley.

1 cup loosely packed fresh flat-leaf parsley leaves 1 medium fennel bulb halved lengthwise, thinly sliced

1 small red onion, halved lengthwise and thinly sliced into half-moons 3 tablespoons fresh lemon juice

1 tablespoon extra-virgin olive oil 1/2 teaspoon celery seeds

Coarse salt and freshly ground pepper

Prepare a large ice-water bath. Put parsley, fennel, and onion in a colander, and set in ice-water bath. Let soak 10 minutes.
Drain, and transfer to a salad spinner. Spin until dry, and transfer to a serving bowl. Add lemon juice, oil, and celery seeds; toss to combine. Season with salt and pepper.

 AND IF YOU ARE NOT A FAN OF ANY OF THE ABOVE SALADS, AND YOU DO NOT WISH TO FERMENT, 

THEN ROAST ALL YOUR VEGGIES AND YOU WILL be so pumped. 


FALL CSA WEEK 3

- P I C K L I S T -

SWEET POTATOES - BRUSSEL SPROUTS - LETTUCE - BASIL - ROSEMARY - SWEET ONIONS -

CARROTS - CELERY - PUMPKIN - APPLE OATMEAL BREAD

F753937F-1F96-4EEB-9F6F-7EA0EA4C0D59.jpg

HOT TIPS (getting right into it):  

BASIL: First, I need you to know that this crop goes on record for the second longest growing basil we’ve ever seen.  For the past 12 years of growing food, I became accustomed to basil as a short season crop.  Every year around August we would see the leaves develop a purple/grey powder on their underbellies- which is a sure sign of downy mildew.  This is also a sure sign of the end for basil.  Downy Mildew is an airborne disease that typically begins in the south and travels north through the air.  For example, Georgia and Florida could experience their decimation of their basil crop in May, and it would arrive on New England farms and gardens in July or August.  Now that we are all experts in disease, this concept of airborne travel is completely relatable.  However, science is gold, and all is not lost.  Seed breeders have worked to bring forth new varieties of organic, NON-GMO basil seeds that are downy mildew resistant, thus elongating our basil crop, and allowing for PESTO making to commence in late OCTOBER, rather then a very rushed, very exhausted night in August.  All that said, downy mildew is no longer a basil issue, BUT the army worms could not be stopped.  For this, we had Anne and her crew of little people ( the grand-kiddos) head to the greenhouse to hunt for army worms.  The intention was to pick off the hungry squatters and drop them into soapy water where they would meet their maker.  UNFORTUNATELY, Anne and crew of Hobbes (4yrs) and Rozzie (2yrs) were no match for these nocturnal tiny beasts.  Bottomline here, we had a good run with basil, but now it's time to call it a day- pick the whole greenhouse and make some late season pesto.  As always, pay no mind to the massive bites out of the leaves, they will not alter the taste of the sweet fresh basil plant and you can rest assured that this crop fed not only you and yours, but also a team of army worms.

Makes about 1½ cups

 The key for this classic pesto recipe is to add the basil at the very end instead of blending everything all at once. That way the basil doesn’t get bruised or lose its flavor and maintains its vibrant green color. 

  • ½ cup pine nuts

  • 3 oz. Parmesan, grated (about ¾ cup)

  • 2 garlic cloves, finely grated

  • 6 cups basil leaves (about 3 bunches)

  • ¾ cup extra-virgin olive oil

  • 1 tsp. kosher salt

  • Preheat oven to 350°. Toast pine nuts on a rimmed baking sheet, tossing once halfway through, until golden brown, 5–7 minutes. Transfer to a food processor and let cool. Add cheese and garlic and pulse until finely ground, about 1 minute. Add basil and place the top back on. With the motor running, add oil in a slow and steady stream until pesto is mostly smooth, with just a few flecks of green, about 1 minute. Season with salt.

  • Do Ahead: Pesto can be made 1 day ahead. Top with ½" oil to prevent browning. Cover with plastic wrap, pressing directly onto the surface, and chill.

  • Cooks’ Note: If you want to use this with pasta, cook 12 oz. dried pasta (we prefer long pasta for pesto) in a large pot of boiling salted water, stirring occasionally, until al dente. Drain, reserving ½ cup pasta cooking liquid.

  • Place pesto and 2 Tbsp. unsalted butter, cut into pieces, in a large bowl. Add pasta and ¼ cup pasta cooking liquid. Using tongs, toss vigorously, adding more pasta cooking liquid if needed, until pasta is glossy and well coated with sauce. Season with salt.

  • Divide pasta among bowls. Top with finely grated Parmesan. 

  • JENNY’S NOTE: PESTO FREEZES BEAUTIFULLY FOR DEAD OF WINTER EATING (OR ANYTIME)

  • ALSO- ROAST YOUR SWEET POTATOES AND DALLOP  ATOP WITH FRESH PESTO AND YOU’RE WELCOME.  


Onto ROSEMARY written by my dear friend Rachael Keener of Alkeme co

(GO PEEP THE WEBSITE, IM IN LOVE WITH ALL THAT THIS WOMAN CREATES) 

ALKEME CO is a collection of everyday elixirs and herbal tonics made and formulated by herbalist Rachael Keener.  Our powders are skillfully crafted and make having a daily wellness ritual easy and enjoyable. Scooped into a drink, blended into a smoothie or mixed into your food—ALKAME CO formulas are here to help.

Rosemary

-- bringer of light. Herb of the kitchen and the apothecary. A mint-family member whose medicine comes in the form of warmth, movement, invigoration and aromaticity.🌿✨

Rosemary, like most every herb, wears many hats. It is traditionally used as a circulatory stimulant for when there is coldness or stagnation in the mind or body (think poor circulation and cold extremities, sluggish digestion, brain fog, heavy, aching menstrual cramps, etc.).

A shaman that I used to work with taught that rosemary brings light into dark places--medicine that I am holding onto and finding strength in during the darkness of these times. This ability to illuminate and transform mirrors the way that it works in the body to unstick energy that is dark, heavy and sometimes toxic. 🌞💡

The darkness that has been festering in our country and is coming to a boil right now can feel sad, scary and anxiety-producing to witness. At times it can bring up feelings of powerlessness. Plants are a good salve for reclaiming our power and providing comfort and unwavering, unconditional support. If you are experiencing any of these things I really encourage you to find some plant allies to connect with--perhaps rosemary or perhaps heart medicine like rose, nervous system tonics like milky oats or mood brighteners like lemon balm.

To incorporate rosemary, chop some up and add it to your soup, drink it as a tea, place a sprig on your altar, windowsill, etc, add it to your potted plant collection and take time to connect to it everyday, smudge with dried stocks of it, add it to your bath--or whatever else you may be called to do with it!🌿🌿  -Rachael Keener

MIREPOIX: 

I will not go into too much detail over mirepoix (because i am starting to sound like a broken record over here with recipes) However, when celery is involved in a CSA box, I can not help but to include onions and carrots.  Because it is officially SOUP SEASON, and a mirepoix of carrots- onion- celery is the backbone to every good soup.  If you are unfamiliar with mirepoix, give it a google!

ROASTED SWEET POTATO SALAD

From my new favorite cook book, start simple by lukas volger

2 med sweet potatoes

½ medium onion cut into 4 wedges

3 tablespoons olive oil, plus more for roasting the sweet potatoes

Salt

2 tablespoons apple cider vinegar

½ teaspoon honey

Fresh ground pepper

½ cup toasted walnuts or pecans, coarsely chopped

½ cup cubed sharp cheddar cheese

1 tart apple, cored and cubed

4 cups tender greens (lettuce mix!)

Preheat oven to 425*f

Arrange sweet potato and onions or onion on a baking sheet.  Drizzle with olive oil and sprinkle with salt and use hands to coat.  Transfer to the oven and roast until the onions are soft and caramelized, 10 to 15 minutes, then remove them from the pan.  Return the sweet potatoes to the oven and bake until tender and a bit blistered, another 10 to 15 minutes.

To make the dressing, finely chop the roasted onion and place in a small bowl or jar.  Cover with the vinegar, honey, and a big pinch of salt, then stir in the 3 tablespoons of olive oil.  season with additional salt and black pepper as needed.

To assemble salad, combine the warm or cooled potatoes with the nuts, cheese, apple, and greens, then toss with most of the dressing, adding more to taste if necessary.  

A NOTE ON YOUR BRUSSEL SPROUTS:

These brussels stalks are not for the faint of heart!  This crop has been hit by Alternaria leaf spot and has hosted a community of aphids during the month of September.  As a result you get a wand of brussels that looks a little gnarly on the outside (yellowed leaves, aphid casings- no active aphids) but when plucked from the stalk, and peeled back reveals the perfect teeny tiny mini cabbage.  For storage, if you are short on fridge space, feel free to leave them in your garage/ or cold mudroom.  

 1½ lb. brussels sprouts, trimmed, halved

¼ cup extra-virgin olive oil

½ tsp. kosher salt, plus more

Freshly ground black pepper 

¼ cup honey

⅓ cup sherry vinegar or red wine vinegar

¾ tsp. crushed red pepper flakes (optional)

3 Tbsp. unsalted butter

3 scallions, thinly sliced on a diagonal

1 tsp. finely grated lemon zest

  • Place a rimmed baking sheet on bottom rack of oven; preheat to 450°. Toss brussels sprouts and oil in a large bowl; season with salt and black pepper.

  • Carefully remove baking sheet from oven. Using tongs, arrange brussels cut side down on baking sheet. Roast brussels on bottom rack until softened and deeply browned, 20–25 minutes.

  • Meanwhile, bring honey to a simmer in a small saucepan over medium-high heat. Reduce heat to medium-low and cook, stirring often, until honey is a deep amber color but not burnt (it will be foamy, that’s okay), 3–4 minutes.

  • Remove from heat and add vinegar and red pepper flakes, if using, and whisk until sauce is smooth (it will bubble up quite aggressively when you add the vinegar before settling). Return saucepan to medium heat, add butter and ½ tsp. salt, and cook, whisking constantly, until glaze is glossy, bubbling, and slightly thickened, 3–4 minutes.

  • Transfer brussels sprouts to a large bowl. Add glaze and scallions and toss to combine. Transfer to a platter and top with lemon zest.

FALL CSA WEEK 2

- p i c k l i s t -

LETTUCE - MIZUNA - LACINATO KALE - CAYENNE PEPPERS - CARMEN (SWEET) PEPPERS -

LEMONGRASS - CAULIFLOWER - ORANGE KABOCHA WINTER SQUASH - LEEKS -

CUCUMBERS - CARROTS - GARLIC - GOLD POTATOES

IMG_2028.jpg

Let’s talk Ginger. Ginger is my forever favorite crop.  I love the magic of propagation that takes place in the early spring stages, the green shoots that emerge from the root, the smell of the ginger greenhouse as you go to weed mid season, and the unbelievable beauty of fresh ginger pulled from the earth after a whole summer of growth.  It is a heaven sent root and I am here for it.  Typically our Fall CSAers get the most out of this Fall crop as we harvest from September-October.  This year however, I got too excited back in the Spring during early propagation.  With real recklessness, I broke the ginger up into pieces that were too small for growth during its initial stages.  Proper budding never occurred and many ginger root babies rotted out.  A total crop failure.  My purpose was to force more ginger earlier and instead I broke up the rhizome too much and weakened the potential for growth.  This goes on the long list I made of farm fuck-ups for 2020.  My purpose in telling you this sob story is to give you an honest heads up around any high expectations of getting ginger this year (not gonna happen).  Also it highlights the benefits of diversified farming.  In any given season no one intends on crop failures- but it happens.  Sometimes weather demolishes a field, bugs eat an entire crop, or this farmer gets too excited.  Bottomline here, thank goodness we grow a bajillion other crops- everything from tomatoes to berries to greens to bedding plants.  Diversified farming allows a margin of error to take place in the field and not collapse the farm.  My in-laws, Anne and Pooh took on diversified farming for this reason and I am so pleased to be grandmothered in.  That’s all I have to say about ginger for now and hopefully that is all I have to say about crop failure for 2020.  Hoping for a better crop in 2021.  

In other news, This might be the best box of food yet- it will be hard to top week 2 of Fall CSA.

 HOT TIPS:

Lemongrass: I add it to every broth I cook with- especially chicken broth- especially chicken broth thickened with coconut milk.  You do not eat the lemon grass directly- chop the bottom whiter/pinker bottom portion and simmer for deep healing aromatics.  If you are not committed to making a broth or using lemon grass this week, chop and freeze on a cookie sheet for 24 hours, and then bag all together and put back into the freezer for future use (this helps so pieces separate easily when frozen).  

TEA!  A few weeks back, Ramone (field crew worker, non stop joker) commented on the fever grass- I corrected him (lemongrass), he corrected me (fever grass). Bottomline, lemongrass is known as fever grass in Jamaica.  Steep in hot water, sip it if you are feeling a cold coming on or currently sick- it’s good for what ails ya.  

A new pumpkin laksa for a cold night by nigel slater (cold weather staple in my house)

The laksa appears complicated at first but in practice it is far from it.  Once you  understand the basics, the recipe falls into place and becomes something you can fiddle with to suit your own taste.  The basic spice needs heat (ginger, garlic, hot pepper); the liquid needs body and sweetness (coconut milk, rich stock); the finish needs sourness and freshness (lime juice, mint, cilantro).  The necessary saltiness comes from nam pla and tamari rather than salt itself.  The notes in place, you can feel free to include noodles, tomaoes, greens, sweet vegetables, or meat as you wish.  What matters is balance.

Enough for 4

Pumpkin (winter squash) - 1.5 cups

Cilantro and mint leaves to finish

FOR THE SPICE PASTE:

Hot peppers- 3-4

lemongrass- 2 plump stalks

Garlic- 2 cloves

cilantro stems- 5-6

Ginger- thumb sized lump

cilantro leaves- a handful

Sesame oil- 2 tablespoons

FOR THE SOUP: 

Chicken or veg stock- 2.5 cups

Coconut milk- 1 ¾ cup

Tamari- 1-2 tablespoons

Nam pla (Thai fish sauce) - 2 tablespoons

Juice of a lime

dried noodles- ½ cup cooked as it says on packet, then drained

Peel and seed the pumpkin and cut into large chunks.  Cook in a steamer or in a metal colander balanced over a pan of boiling water until tender.  Remove from heat.

For the spice paste, remove stems from the chiles, peel the garlic, and peel and roughly chop the ginger and lemongrass.  Put them all into a food processor with the cilantro stems and leaves and sesame oil and blitz until you have a rough paste.  Get a large deep pan hot and add the spice paste.  Fry for a minute, then stir in stock and coconut milk and bring to a boil.  Let simmer for seven to ten minutes, then stir in nam pla, tamari, lime juice, pumpkin, and the cooked drained noodles.  Simmer briefly, add the cilantro and mint leaves over the top and serve in deep bowls.  

ANOTHER SPRAGUE FAMILY STAPLE!

from The First Mess // thefirstmess.com

SERVES: 4

NOTES: If you don’t want to use cassava flour, you can substitute brown rice, chickpea or regular wheat flour. Lower the amount of water to 1 cup if you’re making this substitution (& add more if necessary).-It’s important to really keep an eye on these towards the end of the cooking process. They can go from perfect to burnt in what feels like seconds. -I use a Microplane to get the garlic and ginger nice and fine for the sauce

CAULIFLOWER1 head of cauliflower (about 2 ½ lbs)1 cup cassava flour1 ½ cups water, plus extra½ teaspoon garlic powder1 tablespoon sesame seedssea salt and ground black pepper, to taste

STICKY SESAME SAUCE: ½ cup tamari soy sauce¼  cup maple syrup2 tablespoons toasted sesame oil2 tablespoons rice vinegar1 tablespoon tomato paste2 tablespoon chili paste (or to taste)3 cloves garlic, peeled & finely minced3-inch piece fresh ginger, peeled & finely minced2 tablespoons sesame seeds

Preheat the oven to 450 degrees F. Line 2 baking sheets with parchment paper.Cut the cauliflower into small florets. In a large bowl, combine the cassava flour, water, garlic powder, sesame seeds, salt, and pepper. Whisk to combine. The resulting batter should be fluid but thick--thick enough to coat a piece of cauliflower and pool only slightly once set on the baking sheet. If the batter is too thick/pasty, add water by the tablespoon until you reach the proper consistency.Drop the cauliflower florets into the batter and stir until all pieces are coated. Using a fork, carefully transfer battered cauliflower to the baking sheets, leaving 1 inch of space around each floret.Bake the battered cauliflower for 20 minutes. While the cauliflower is baking, make the sauce. In a small saucepan combine the tamari, maple syrup, sesame oil, rice vinegar, tomato paste, chili paste, garlic, ginger, and sesame seeds. Bring the sauce to a boil on the stove over medium heat. Simmer for 5 minutes or until slightly reduced. Set aside.After cauliflower has baked for 20 minutes, remove and let cool slightly. Once it’s cool enough to handle, transfer the par-baked cauliflower to a large bowl. Cover the cauliflower with all but 3 tablespoons of the sesame sauce. Toss to thoroughly coat the cauliflower.Bake the cauliflower for another 20 minutes, or until the edges are starting to darken. Remove the cauliflower and let it sit for a full 5 minutes before serving in lettuce wraps, on rice etc. with remaining sauce, extra sesame seeds, and chopped green onions.

Preheating the pan helps the leeks take on some color; cooking at a lower temperature ensures they're fully tender.

  • 6 leeks, white and pale-green parts only

  • ½ cup olive oil

  • Kosher salt

  • Place a rimmed baking sheet in oven and preheat to 400°. Cut leeks in half lengthwise. Rinse well and pat completely dry. Toss with oil in a large bowl; season with salt.

  • Arrange leeks, cut side down, on hot baking sheet and cover loosely with foil. Reduce oven temperature to 300°. Bake until leeks are lightly browned on cut side and very tender, about 1½ hours.

  • Uncover leeks and turn cut side up. Increase oven temperature to 400°; roast leeks until golden brown, 15–20 minutes. (Reserve the oil for making vinaigrettes or roasting vegetables. Let cool; cover and chill.)

  • DO AHEAD: Leeks can be baked 4 hours ahead. Let cool; cover and chill. Bring to room temperature before serving.

FALL CSA WEEK 1

p i c k l i s t

Sweet Onions - Lunch Box Peppers - Bell Peppers - Mint - Spinach - Beets -  Lettuce - Buttercup Squash - Sweet Peppers (bell and carmens) - Lettuce  - Broccoli Florets - Radishes OR Purple Top Turnips - Heirloom Tomatoes - Poblanos OR LEMON DROP HOT PEPPER

59F9596E-39C0-4D2A-B106-682A7081D711.jpg

Holy smokes yall we made it to FALL!  I took a HUGE sigh of relief on Sunday as we made it through the brunt of the growing season with all of our fingers and toes and health intact.  What a Summer of unknowns for everyone.  Luckily our food supply is pretty high and constant this time of year.   We are still pulling carrots from the earth and we have stacks on stacks of potato bins piled high.  I am continually blown away by all that we reap from June-November and you, our sweet CSA fam, get to enjoy the final stretch of the growing season with us.  Cheers to all the root vegetables that will be spilling over into your oven and the greens that I will forever suggest bathing in extremely heavy cream or coconut milk from here on out.  

HOT TIPS:

Mint! This is one of my all time favorite herbs perking up any meal and beverage.  I am a huge fan of chopping said herb into salads or sprinkling it over roasted veggies.  However this time of year I hoard mint like crazy to dry- hanging every and all bunch upside down for a few days.  Once the herb is nice and dry, I remove the stem and store the leaves in a jar for tea.  My hoarding and drying can take my tea drinking through the winter into the beginning of greenhouse season, just in time to see fresh herby green shoots punch out from the garden.  Springtime perennial sprouting plants blow my mind E V E R Y T I M E.

 BEETS!!: dice and roast asap to enjoy with every meal all week long.  

For a more formal recipe see below:

  • 1 cup beets

  • 3 tablespoons olive oil, divided

  • 1 tablespoon chives

  • 2 tablespoons verjus

  • 2 tablespoons mint

  • 2 cups spinach

  • Chopped lettuce

  • 1/4 cup goat cheese

  • sea salt to finish

BY KRISTIN CELESTE SHROEGER / PHOTOGRAPHY BY MARGOUX GIBBONS 

Preheat oven to 350°.

Wash and dry produce. Slice 1 cup beets and place in foil. Stir in 2 tablespoons olive oil and a pinch of sea salt. Seal beets in foil and bake for 30 minutes at 350°. Remove beets from oven and let cool to room temperature, reserving beet oil on foil.

Drain remaining beet oil from foil into a glass jar. Mince 1 tablespoon chives. Stir in verjus and 1 tablespoon olive oil to the jar. Gently stir in chives to the dressing and season to taste with sea salt and pepper. Remove mint leaves from stems, mince 2 tablespoons mint and place in a large glass bowl. Remove stems from 2 cups spinach. Add greens and lettuce to the bowl and toss together with mint leaves. Gently stir in 3 tablespoons of dressing and let salad rest for 5 minutes.

Plate 2 salads with 2 heaping cups of greens, 1/2 cup beets and 2 tablespoons goat cheese. Serve salads drizzled with 1 tablespoon dressing and a sprinkle of sea salt.

1¾ oz butter

1 onion, finely chopped

3 cloves garlic, finely chopped

1 teaspoon cumin seeds

1 cup (200 g/6½ oz) basmati rice, rinsed and drained

1⅔ cups (410 ml/13 fl oz) chicken stock

4 cups (160 g/5¼ oz) roughly shredded English spinach leaves, or 1 packet (250 g/8 oz) frozen spinach, thawed, drained and chopped

1/4 cup (15 g/½ oz) chopped mint

Method

1. Melt the butter in a large pan. Add the onion and cook over moderate heat until it is soft and golden. Add the garlic and cumin seeds and cook for 1 minute.

2. Add the rice and stir until it is covered with the butter and onion mixture. Pour in the chicken stock. Bring to the boil; reduce the heat to very low and cover with a lid. Cook for 15 minutes, or until the rice is tender and most of the stock is absorbed. Take care not to let the rice burn. (If the rice runs out of stock to cook in, just add a little water.)

3. When the rice is cooked, remove the lid and stir in the shredded spinach, in batches. Keep stirring while the spinach cooks-this will only take a few minutes. Cook until any excess liquid has evaporated. Season well with salt and black pepper. Stir in the mint and serve immediately.

PEPPERS

Yall, unless the lunchbox peppers make it into next week, THIS WILL BE THE VERY LAST OF SWEET PEPPERS OF THE SEASON and it's been a damn good run…  If it were me, and I was in your kitchen, I would roast and freeze these bad boys for January eating.  BUT if you are set on making meals this week, then let's try out the old STUFFED PEPPER recipe, shall we?  

NOTES: If you don’t have a grill or grill pan, you can simply toss the pepper halves in oil, salt, and pepper, spread them out on a baking sheet, and roast in a 400 degree oven for about 20 minutes, or until slightly softened.

⅓ cup French lentils, rinsed¼ cup pitted olives (green or black)¼ cup flat leaf parsley (or mint!), packed½ teaspoon lemon zest1 cup walnut halves1 clove garlic, peeled1 ½ tablespoons olive oil, plus extra2 teaspoons lemon juice1 ½ teaspoons smoked paprika1 ½ teaspoons chili powder½ teaspoon dried oregano½ teaspoon ground cumin½ teaspoon ground coriandersea salt & ground black pepper, to tastesweet bell peppersparmesan

Place the lentils in a small saucepan and cover them by about 2 inches with water. Place the saucepan over medium-high heat with the lid on. Bring the lentils to a boil and then simmer until tender, about 20 minutes. Drain lentils and set aside.On your cutting board, chop the olives, parsley, (mint?!) and lemon zest all together, forming a sort of rustic salsa relish. Once the olives are nicely chopped, set the mixture aside in a bowl.
In a food processor fitted with the “S” blade, combine the cooked lentils, walnuts, garlic, olive oil, lemon juice, smoked paprika, chili powder, oregano, cumin, coriander, and lots of salt and pepper. Pulse until you have a coarsely ground mixture that holds together when pinched. It should be slightly paste-y with little chunks of walnut and lentils. Give the crumble a taste and adjust the seasoning if necessary.Heat a medium (preferably nonstick) skillet over medium heat. Scrape all of the walnut and lentil crumble into the pan. Break it up with a spatula. Cook the crumble, stirring constantly, until it’s slightly drier and a bit deeper in colour, about 4-5 minutes. Remove the walnut and lentil crumble from the heat and set aside.Cut the sweet bell peppers in half lengthwise. Remove the ribs and seeds and place them on a baking sheet. Drizzle the peppers with olive oil and season with salt and pepper. Toss to evenly coat the peppers.Preheat the grill to medium-high. Once heated, place the mini peppers--cut side down--onto the grill. Cook until light char marks form on the underside, about 4 minutes. Flip the peppers over and cook for another 4 minutes or so. The peppers should be slightly softened, but still holding their shape. Remove the grilled peppers and place them back on the baking sheet.Arrange the grilled peppers--facing up--on your serving tray. Stuff each grilled pepper half with 2 tablespoons of the spiced walnut and lentil crumble. Top each stuffed pepper with a bit of the olive and parsley mixture. Finish the peppers with a sprinkle of vegan parmesan, if using. Serve warm or at room temperature.

CSA WEEK 17

P I C K L I S T

Onions - Sweet Habanada Peppers - Plum Tomatoes - Basil - Spinach - Carmen Peppers -

 Potatoes - Carrots - Jalapeno Peppers - Spaghetti Squash

B8B18CE0-FA0C-4A5D-9DCE-DF63582AF64B.jpg

Oh Summer CSA fam! This will be our last week together, and it is incredibly bittersweet.  Together, we completely rocked this season in picking, washing, packing, prepping, chopping, roasting, preserving, eating, etc…  My hope is that the weekly CSA share served as a marking of time as we nourished ourselves through this season.  We went from little greens and strawberries in June, Blueberries and cucumbers in July, Tomatoes and corn and more tomatoes in August, peppers and potatoes in September, Winter Squash and greens in October, and herbs all the way through.  With a whole summer of no-friends-covid, you CSAer and our field crew have served as my nearest and dearest and I love you all for it.  Though we never formally partied in person, we communed weekly through food!  Thankyou for inviting our farm into your kitchen all Summer long.  

I also want to take a hot minute to sing the praise of our unsung field crew heroes.  They range from the age of 1.5-60 something years old. Roy, Strong, Ramone, Jasper, Garnet, Petey, Jaarsma, Dave, Juliana, Gus, Mike, Mrs. T, Ray, Hobbes, Billie, Anne and Pooh.  These are the people that seeded, grew, planted, weeded, picked, cleaned, packaged, planted some more, picked some more, etc…  These are the people that made all of this food show up on Wednesdays and goodness gracious, I am so grateful to each and everyone of them.  Mrs. T took on the super-early-before-sunrise herb pick, Roy packed out each and every box with me, Strong and Ramone bunched the most beautiful bouquets of mizuna, Jaarsma delivered boxes all around town, Jasper and Garnet gathered all the cherry tomatoes from the field, Dave assembled and stacked every wax box for us to fill, Billie ate all the pepper rejects, and damn near everyone picked strawberries.  This crew is everything.  

Lastly, with the end of Summer CSA comes the end of the Farmstand.  We officially shut the sliding barn doors for the season on October 11th at 4:30pm.  If you are deeply saddened by this (i am!) you can find our harvest at the following spots:

All the COOP food stores (Lebanon, Hanover, WRJ) - Crossroad Farmstand in Norwich for onions and potatoes - Brownsville Butcher and Pantry - Woodstock Farmers Mkt - Sweet Beet Market in Bradford NH - Rumbrook Mkt in Grantham 

AND OF COURSE THERE IS THE FALL CSA: 10 SPOTS LEFT!!

HOT TIPS:

Jenny’s Note: The following recipe is a spinach staple in my house.  It is warming and earthy and absolute comfort food.  We have yet to start our Ginger harvest due to an extremely wimpy ginger crop (my fault im a terrible ginger grower).  So please source yourself a can of coconut milk, ginger root, and a pinch of cumin and we will take care of (mostly) the rest.  

  • 3 tablespoons ghee/coconut oil/butter

  • 20 ounces flat-leaf spinach, washed and drained

  • 2 shallots (or onions), halved and sliced

  • 1 tablespoon minced fresh ginger

  • 2 teaspoons minced jalapeno chile

  • 2 tablespoons unbleached all-purpose flour

  • 1/2 teaspoon ground cumin

  • Pinch of sugar

  • 1 cup coconut milk

  • Kosher salt and freshly ground pepper

Directions

  • Heat scant 1 tablespoon ghee in a large Dutch oven over medium. Add spinach and cook, stirring, until just wilted, 3 to 5 minutes. Drain spinach in a sieve, pressing to remove excess liquid. Let cool slightly, then roughly chop.

  • Return pan to medium heat and melt remaining 2 tablespoons ghee. Add shallots, ginger, and jalapeno and cook until softened, 3 to 5 minutes. Stir in flour, cumin, and sugar and cook for 1 minute, then slowly whisk in coconut milk. Bring to a boil, reduce to a simmer, and cook until thickened, 1 to 2 minutes.

  • Stir chopped spinach into coconut mixture and season with salt and pepper.

Oh my Gosh, Spaghetti Squash by Sarah Britton (read on for nutrition and eating)

Winter squash rocks because it is a powerhouse veggie. Unlike summer squash (re: zucchini, crookneck, pattypan), winter squash has had a lot more time to develop and pump itself full of vitamins and minerals throughout its lengthy life on the stem. We’re talking oodles more vitamin A (in the form of beta-carotene), vitamin C, manganese, potassium, and even some extra dietary fiber thrown in just for kicks. This combination of nutrients spells good news for asthma sufferers, those with heart disease, elevated cholesterol, or inflammatory conditions such a rheumatoid and osteoarthritis.

The other bonus? Nature designed summer squash to be rather delicate, with a high water content for those hot summer days when we need a cool down. Naturally, their shelf life is rather short during our abundant harvest season when produce is plentiful. On the flip side, winter squash has a tough outer skin and lower water content, which allows it to be stored for a very long time – some varieties up to six months. This means that we can keep these vitamin bombs around for a long time after the first frost to provide our bodies with the nutrition we need to see us through the long months of winter when there is nothing fresh in sight.  Put that in your oven and roast it.

Ingredients:

1 spaghetti squash

1 bunch kale (leftover from last week? Or try it wth spinach?)

1 ½ cups cooked chickpeas (or 1 can)

3 cloves garlic

olive oil

sea salt

pinch crushed chilies

¾ cup toasted hazelnuts

Pecorino Romano (hard sheep’s milk cheese)

Directions:

1. Preheat oven to 400°F.

2. Prepare the spaghetti squash by cutting it in half lengthwise, removing the seeds, rubbing the inside of each half with a drizzle of olive oil, then seasoning with salt and pepper. Place face down on a lined baking tray and place in the oven – cook for about 45 minutes.

3. While the squash is baking, prepare the rest of the filling. Wash kale well and remove the tough center rib of each leaf. Roughly chop kale into small pieces.

4. Heat oil, ghee, or butter in a frying pan, then add minced garlic, crushed chilies to taste, and a pinch of sea salt. Cook 2 minutes until fragrant, then add chopped kale and cook until the leaves are bright green and just starting to lose structure. Throw in the chickpeas and cook just to warm. Remove from heat.

5. Remove squash form the oven when it is cooked through. Using a fork, scrape out the insides, which will pull away from the shell in strands, like spaghetti (whoa). Place all strands in a bowl, and toss with the kale and chickpea mixture. At this point you can either serve it from the bowl, or mix it everything together and place back in one half of the empty squash shells for a beautiful presentation. Sprinkle with chopped toasted hazelnuts and shaved Pecorino Romano. Enjoy.

I wish everyone out there a truly beautiful Thanksgiving; we sure have a lot to celebrate.

This year I am grateful for so many things: the incredible people in my life, a job that I love everyday, the warm food in my belly, sound sleep in the night. I also want to give thanks to you for reading this, for caring, and for getting back in the kitchen again to feed your body with the food it deserves. Even though we’ve probably never met, I can feel us standing side by side at our cutting boards, making so much more than dinner.

 JENNYS NOTE:  my goal in life is to always have a jar of pickled onions in my fridge- this is the recipe i use.  Fin.

 You can use any thinly shaved or sliced vegetable you like for this recipe. We love quick pickles on sandwiches because they add acidity and crunch. And you don't have to be someone who's "into canning" to make your own. Keep them in the fridge for days and put them on everything.  Makes about 1 cup

  • ½ cup unseasoned rice vinegar

  • 1 Tbsp. sugar

  • 2 tsp. kosher salt

  • 1 cup thinly sliced vegetables (such as carrot, red onion, and/or cucumber)

  • Whisk vinegar, sugar, and salt in a small bowl until sugar and salt are dissolved. Add vegetables and let sit, squeezing gently with your hands occasionally to help them pickle more quickly, 10 minutes.

  • Do Ahead: Vegetables can be pickled 3 days (months) ahead. Cover and chill.

CSA WEEK 16

- P I C K L I S T -

Leeks - Lunch Box Peppers - Plum Tomatoes - Cherry Tomatoes - Chives -

Beets - Red Kale - Potatoes - Broccoli

33D62D02-EB07-400B-97BE-E3A05D573773.JPG

Our beloved farmstand closes for the season on October 11th.  This means you have exactly 11 days to bask in the light of phenomenal heirloom tomatoes, Fall Raspberries, winter squash, warm baked goods, Allie Boeri* and the rest of the badass farmstand crew.  If you can not stand the thought of the farmstand closing, here are some ways to extend your eating season with us.

  1. CSA FALL SHARES STILL AVAILABLE (sign on through the website or in-person at the farmstand) 

  2. Place an order at the farmstand for bulk crops

Think: Plum Tomatoes, Herbs, Beets, Onions Potatoes, Carrots, raspberries, winter squash, etc… for Winter storage.  To do so call the number: 603-298-5764

  1. From the Fields to our Freezer to your freezer!  The good folks in the kitchen have been pumping out soups, sauces, pestos, pizza dough, berries, etc for the purchasing and the eating.  Check out the selection and load up with all the frozen meals to minimize cooking while still eating good grown food.  

  2. VOTE.  JK on this extending the 2020 EDGEWATER SEASON with us.  I just assume that if you’ve made it this far in the newsletter, I have your attention.  Vote for the planet, Vote for democracy, Vote for Racial Justice.  Your vote is your voice so eat your beets, eat your kale, drink water, stay focused, tell your friends, make sure you have a plan, and do the damn thing.  Ok, stepping down from my Bushel Box.   FOR MORE INFO:

*ALLIE BOERI:  an actual real life superhero keeping us all grounded and light.  She manages the farmstand, teaches us about plants during greenhouse season, shares in the FALL CSA love fest,  interpersonal communicator extraordinaire and the occasional teller of questionably inappropriate jokes.  We love Allie.

  HOT TIPS:

from The First Mess // SERVES: 4-6

NOTES: I would make this a meal by serving it in a grain bowl-style setup with some cooked farro, white beans, and a big handful of chopped/baby greens per person.-I used (potatoes) and beets, but any mixture of root vegetables you like is good. You’ll need 1 ½ pounds.-If you don’t have za’atar spice blend, that’s fine! Just use salt and pepper. The sauce is super flavorful.

ROOTS:

1 lb potatoes, chopped into 2-inch pieces

½ lb beets, (3 medium/4 small) peeled and chopped into 1-inch wedges

1 tablespoon olive oil1

½ teaspoons za’atar spice

sea salt and ground black pepper, to taste

YOGURT SAUCE:

1 cup mixed herbs, packed (I used parsley, dill & basil, chives), plus extra for garnish

1 small jalapeño pepper (do you have some leftover jalapenos from previous CSA week?  If not any hot pepper will work) seeded and chopped (I left some of the seeds because I like the heat)

1 garlic clove, peeled

2 tablespoons shelled and salted pistachios, plus extra for garnish

2 tablespoons olive oil1 tablespoon lemon juice

sea salt and ground black pepper, to taste

1 cup thick yogurt 

Preheat the oven to 375 degrees F. Line a 9x13x2 baking dish with parchment paper.Place the chopped potatoes and beets in the baking dish and toss them with the olive oil, za’atar, salt and pepper. Once the vegetables are evenly coated, spread them out into a single layer and slide the dish into the oven. Roast the vegetables for 1 hour, taking them out at the halfway point to stir them up and flip them over.Make the herbed jalapeño yogurt sauce: In a food processor, combine the herbs, jalapeño, garlic, pistachios, olive oil, lemon juice, salt, and pepper. Pulse the machine a few times until everything is finely chopped, scraping down the sides of the bowl with a spatula  if necessary. Add the non-dairy yogurt to the food processor and pulse until the sauce is fully combined and uniformly light green. Check the sauce for seasoning and adjust if necessary.

To serve: Spread the herbed jalapeño yogurt sauce out on the base of your serving plate. Pile the roasted root vegetables on top of the yogurt sauce. Garnish the grounding roasted roots and herbed jalapeño yogurt sauce with extra chopped herbs and pistachios. Serve warm or at room temperature.

From The First Mess (thefirstmess.com)  SERVES: 4

NOTES: You could use chard or actual beet greens for the salad as well. If you only have access to bigger beets, just cut them into quarters or sixths pre-roasting. Some crunchy, toasted hazelnuts would be a nice garnish here too.
BEETS:

5 beets: chopped, scrubbed and trimmed

1/2 cup balsamic vinegar

3 tbsp demerara sugar

2 tbsp grape seed oil

salt and pepper

KALE & SALAD:

1/2 cup quinoa, rinsed

1 bunch of curly kale, stems removed and leaves torn into bite-size pieces

2 tbsp grape seed oil

1 clove of garlic, peeled and finely sliced

1 tsp smoked paprika

salt and pepper

handful of pecorino shavings (parm or grana padano would be great too)

Preheat the oven to 400 degrees F.

Place the beets in a 2 inch deep ceramic or glass dish. Pour the balsamic vinegar and grape seed oil in. SPrinkle the muscovado sugar, salt and pepper around the beets. Cover dish with foil and roast for 30 minutes. Remove the foil, stir the beets up a bit and continue to roast, uncovered, for 20 more minutes. They should be quite tender. Remove from the oven and allow dish to cool.

In a small saucepan, place the rinsed quinoa and 1 cup of water. Add a pinch of salt. Place pot over medium heat and bring to a boil. Simmer for 15 minutes or until quinoa is mostly cooked and the little tails start to pop out. Remove from the heat and set aside.

In a large soup pot, heat the 2 tbsp of grape-seed oil over medium heat. Add the sliced garlic and smoked paprika. Stir around until fragrant, about 30 seconds. Add the quinoa, a splash of water and half of the kale. Stir around until kale begins to wilt a bit. Add the remaining kale, season with salt and pepper and keep stirring. The kale should all be slightly wilted, but still firm. Take off the heat and transfer kale and quinoa mixture to your serving bowl.

Arrange roasted beets on top of the greens and quinoa. Drizzle salad with the balsamic cooking liquid in the pan (there should be about 1/4 cup of it left). Scatter  the pecorino shavings on top and serve.


CSA WEEK 15

- P I C K L I S T -

Sweet Peppers (all of them i promise: CARMEN, LUNCHBOX, HABANADA) - Arugula/Mizuna - Parsley - 

Gold Potatoes - Kol Rabi - Garlic - Green Tomatoes - Plum Tomatoes

IMG_1270.jpg

Written on the morning of the Fall Equinox- bundled in wool, sitting next to the wood stove as she hosts the first fire of the season, and me with my one millionth cup of coffee of the season.  Today I begrudgingly welcome the Fall.  Summer is glorious around here and everyday is packed with light and abundance.  The food floods the plants, the kiddos need only shoes, underwear, sun hat (pants always optional), and we (the big farmers) run on coffee, water and a truck load of bushel baskets.  Everyday is filled with purpose and movement and snacks in every field.  Hot damn Summer is my season.  But as we are reminded by too many songs and poems- the seasons change yatta yatta yatta.  

In past years this movement into Fall occurred way more gradually.  It was a real easing in.  But this past Friday frost hit, three nights in a row, and it hard.  To prep, we stress picked bins of peppers, bushels of eggplants and crates upon crates of tomatoes.  We covered the green beans with remay, scooped up all of the winter squash, and Anne ran irrigation on her prized zinnias.  We did what we could, and held on tight to the hopes of a thick Connecticut River fog to cover the fields (this prevents frost).  But there is little moisture in the air.  Friday night the temps dipped, and all that was not covered and all that is not cold hardy got hit by the inevitable change of seasons.  And I cried multiple times.*

It’s hard to watch a field of food that you and the earth (mostly the earth) worked so damn hard to grow, get beaten up so badly in one night.  There could have been so much more to reap and feed.     

Pooh- my father in law/story-teller/tractor driver/plant propagator/knowledge base for all things soil and farm mentioned this was the earliest frost he’d seen in literal decades.  The last time he saw a kill frost come this early, Ray was toddling around playing a gourd like a guitar about 34 years ago.   

So here we are, moving right into Fall, with a lot still growing- but those Summer Gems (eggplant, peppers, corn) are gone.  I mean we still have bins of them stored in a cooler but they will be empty in one week’s time.  You (CSAer) will get the last of the peppers, and I somehow need to find a minute to freeze the last of the corn.    

ALSO CSA friends!  There is still room in the FALL CSA!! Sign on so we can continue to hang out over crops and recipes from now until Thanksgiving.  

*also the passing of Ruth Bader Ginsburg did a number on my heart strings. 

 May have added to the frost tears.  RBG may your memory be a blessing.  

HOT TIPS:

The following recipe (romesco) is a RAY SPRAGUE FAVORITE, and this guy hates the taste of peppers.  We typically make a huge batch and freeze into pint containers to smear on pasta, toast, etc all winter long

 SUNFLOWER ROMESCO (from the blog: thefirstmess)

½ cup toasted sunflower seeds

2 roasted red peppers (homemade or from a jar)

2 cloves of garlic, chopped

1 teaspoon smoked paprika

½ teaspoon aleppo pepper, or a pinch of cayenne

2 tablespoons sherry OR apple cider vinegar

1 tablespoon tomato paste

small handful flat parsley leaves

sea salt and ground black pepper

scant ½ cup virgin olive oil

Make the sunflower romesco: In the bowl of a food processor, combine the sunflower seeds, roasted red peppers, garlic, paprika, aleppo pepper, vinegar, tomato paste, parsley, salt, and pepper. Pulse the mixture until all ingredients are finely chopped and lightly pasty. Scrape the bowl down. Then, with the motor on low, drizzle the olive oil in through the feed tube until fully incorporated. Check the sauce for seasoning. Transfer sauce to a sealable jar, and set aside in the fridge until ready to use.

THE FOLLOWING IS A GREAT GUIDE

 If making a large batch and storing in the freezer:

parchment paper

air tight containers that are freezer safe

For storing in jars

  • vinegar (plain, balsamic, white/red wine, or apple cider)

  • mineral salt

  • olive oil

  • clean pint sized mason jars

PREPPING PEPPERS:  There are two ways to prepare your peppers for roasting.

  1. The first is to simply roast the whole pepper, seeds, stem and all. (This will work with all roasting methods.)

  2. The second is to slice the peppers in half lengthwise, remove the stem and seeds, and place on the baking sheet cut side down. (Use this method for the oven method and/or when using a baking sheet. These peppers require no flipping, only rotating of the baking sheet. This is my favorite way of roasting peppers.)

ROASTING METHODS:  Oven: Preheat oven to 475 degrees F. Line a baking sheet with parchment.

Place peppers on baking sheet. Bake 4 – 5 inches from the flame. If using an electric oven or there is no flame, place baking sheet on the middle rack. Roast peppers for 40 minutes, turning at least once during cooking using sturdy tongs (if peppers are sliced in half no need to turn, just rotate the baking sheet 180 degrees). They are ready when charred/blackened and blistered. Whole peppers will still be full of air and puffy once removed from the oven. As the peppers cool they will deflate and become wrinkly looking. 

Broiler: I used to have an oven where the broiler was underneath the oven, now mine is in the oven. Either way, turn broiler to medium – high (or 500 degrees if yours is by numbers) and char peppers turning every so often until browned and blackened. If you’ve prepped your peppers by slicing in half, no need turn the peppers, simply adjust the baking sheet turning it to get all the peppers charred. This may take anywhere from 15 – 25 minutes.

 Open Grill: Place whole peppers on their sides over an open flame on the grill, turning every now and then until nicely charred all over. Depending on how big your grill is will determine how many you can do at one time.

Stove Top: If roasting just 1 or 2 peppers, you can roast it over the gas burner of your stove (I suppose you could do 4 peppers utilizing each burner). Place pepper on its side and adjust the flame so it ‘licks’ the peppers. Keep an eye on it and turn it as needed to blacken and char, about 15 – 20. This tends to be a more time consuming method since you have to be so watchful.

From here use right away to make hummus, romesco, soups, layer on sandwiches and toss in salads, etc.

STORING:  

Refrigerator: Great for short term storage.

Keep leftovers in an airtight container in the refrigerator for up to 5 – 6 days.

If you coat them with a little oil they will for a couple of weeks. You can even add some of the pepper juices to the container.  To always be safe, at the first sign of mold or spoilage, throw away immediately.  If storing for longer, you have a couple simple options:

Freezing: This is my favorite method of long term storing, as it is not blended with any other flavors, it’s super easy to do, and they thaw out amazingly well.  Freeze your peppers in a tightly sealed container. They thaw out pretty fast once removed from the freezer making this a nice way of preserving your precious peppers.

Vinegar Method: This method will leave your peppers with a little bit of tang from the vinegar, in some cases it may overpower them, but it’s a great way to store them. Use these peppers for sauces, dips, and soups.

Place peppers in a jar with a little salt, vinegar and pepper juices.  To do this you’ll want to sprinkle your peppers with a generous pinch of mineral salt and mix well.  Place 1/2 inch of vinegar at the bottom of your pint sized mason jar, add peppers leaving about 1 1/2 inches headspace.  Using the handle of a spoon or fork, poke along the inside edges of the jar to release air bubbles (this is important), pour reserved pepper juices over top so peppers are completely covered, leaving 3/4 inch room.  Add about 1/8 inch of olive oil over top to keep air out, leaving 1/2 inch headspace.  Seal and place towards the back of the refrigerator. Will be good for up to 2 months, maybe even a little longer.  If you see any sign of mold or spoilage, throw away immediately!

GREEN TOMATOES:  

I am in love with the below recipe- reminds me of my georgia roots- this was a favorite recipe eaten at our favorite restaurant, The Flying Biscuit

For the cashew relish:

1 1/2 cups cashews

2 red jalapenos, stemmed, seeded and roughly chopped

1/3 cup fresh cilantro leaves

3/4 cup honey

1/3 cup white vinegar

For the tomatoes:

2 1/2 cups milk

2 eggs

1 1/2 cups all-purpose flour

1/2 cup cornmeal

1 tablespoon salt

1 tablespoon celery salt

1 tablespoon black pepper

1/2 tablespoon cayenne pepper

1 teaspoon onion powder

1/2 teaspoon paprika

4 medium green tomatoes, sliced 1/2 inch thick

6 cups canola oil

1/2 cup goat cheese

Prepare the relish: In a food processor, add cashews, jalapenos and cilantro and pulse just until combined. Transfer to a bowl. Add honey and vinegar and mix thoroughly.

Prepare tomatoes: In a bowl, combine milk and eggs. Set aside.

In a bowl, combine flour, cornmeal, salt, celery salt, black and cayenne peppers, onion powder and paprika.

One at a time, dredge tomato slices in flour mixture, then in the egg mixture, then in the flour mixture again.

Heat the oil to 375 degrees. Fry tomatoes, a few at a time, until golden brown. Drain briefly on paper towels. While still hot, place three to four tomatoes per plate. Top with goat cheese and cashew relish.

Makes 4 servings

GREEN TOMATO CAKE

This recipe was shared by Becca Webb of Two Potters on her instagram page. She and her husband Nathan craft beautiful and resilient pieces of kitchenware (mugs, bowls, plates, vases, etc…) I can testify to their resilience as I take my car mug (though I call it my field mug) on all morning harvests. It has been left in fields overnight, and fallen off many a kubota buggy. Bottomline, though I have not taste tested this recipe, I trust their craftsmen ship and therefor am eager to bake this cake come weekend. You in?

IMG_1183.jpg
IMG_1184.jpg


CSA WEEK 14

- p i c k l i s t -

Mizuna greens - Corn - Field Plum Tomatoes  - Shallots - Summer Squash -Chinese Eggplant -

Japanese Eggplant -  Orange Sweet Peppers - Lemon Drop Hot Pepper - Lemongrass - Thai Basil - Carrots

C88E6AC3-5A94-42F0-ABB1-C5BE447F4588.jpg

The corn has returned!  The temps have dropped! It’s raining eggplant this week!  I won’t go too deep into farm ins and outs because of said eggplant.  I will spend the majority of this newsletter providing hot tips on this magical purple fruit.  But I do need you to know that I am no longer starting the day in shorts and t, and have really gone all out with woolens, neoprene gloves and negative-30-degree friendly boots.  Oh Summer, I miss you already!  

All that said we are gearing up for the Fall.  Ray, Mike and Pooh just began the nightly potato dig-til-after-dark, The onions are curing in the greenhouse, and last night I convinced my 4 year old that it was midnite at 8pm (PLEASE GO TO SLEEP IT'S SO DARK OUT).   

HOT TIPS:

Babaganoush

Sourced from http://www.kitchen511.com/blog/2020/5/19/baba-ganoush by Eden Grinshpan

JENNY’S NOTE: This is one of my all time favorite ways to eat eggplant- if you are overwhelmed with eggplant and do not have it in you to make a curry or eggplant parmesan, this is by far the easiest and most delicious way to go.  Fin.

  • 2 eggplants

  • 1/4 cup garlicky tahini (I just added a grated garlic clove to my tahini)

  • 1 tsp kosher salt

  • 1 tsp fresh lemon juice

  • pomegranate seeds (JENNY’S NOTE:  optional- perhaps get your hands on some FALL RASPBERRIES to keep it local)

  • pomegranate molasses (JENNY’S NOTE: again, use honey to keep it local!)

  • fresh mint

  • fresh basil

  • za’atar olive oil (In a bowl combine 2 tablespoons za’atar spice with 3 tablespoons extra virgin olive oil; stir until blended) JENNY’S NOTE: Even if you can’t get your hands on za’atar, make this- still delish)  

    Heat a grill (high heat). You can also use the burner on your stove, just be sure to line it with tinfoil.

    Score the skin of the eggplant. Place on a very hot grill for 30 minutes until the skin is black and the eggplant has deflated, is fully cooked and has developed a smoky flavor, making sure to turn the eggplant several times on the grill.

    Let cool on a strainer so all the juices drip away. Once cooled, removed the skin from the eggplant meat and place in a bowl with 1/4 cup of the garlicky tahini, fresh lemon juice and the kosher salt. Mix with a whisk until all is combined. You may need to add more garlicky tahini depending on the size of the eggplants.

    Place a cup full of the dip into a bowl and using your spoon to spread it so there is a well in the center. Drizzle around a teaspoon of pomegranate molasses on top, then 1/2 tsp of the za’atar olive oil. Sprinkle on pomegranate seeds and garnish with leaves of fresh basil and fresh mint. Serve with warm bread. If you can’t find warm pita, challah works great too.

Recipes below from the cookbook: Chang Mai Cookery School  (inside scoop, i’m a graduate!)

GREEN CURRY PASTE:

The idea of making this Thai green curry paste from your kitchen in NH/VT might seem daunting.  You will have to go out of your way to source other ingredients BUT this is my plan for the weekend, and I thought it could be yours as well.  I will make a couple of batches and freeze into ½ pint jars to be consumed all winter long.  Just add coconut milk and veggies, then close your eyes and make-believe that you are in Thailand.  

DRIED INGREDIENTS: 

1 teaspoon coriander seeds- roasted until brown

½ teaspoon cumin seeds

½ teaspoon black peppercorns

½ teaspoon salt
FRESH INGREDIENTS:

1 teaspoon ginger- skin removed finely chopped

3 tablespoons lemongrass - lower ⅓ only, chopped

1 teaspoon kaffir lime peel - chopped

2 tablespoons coriander (cilantro) root - chopped

2 tablespoons shallots - chopped

1 tablespoon garlic crushed

1 teaspoon shrimp paste

1 teaspoon turmeric - skin removed, chopped

20 small, green chillies

1 cup thai basil leaves

Put the coriander seeds, cumin and black peppercorns into a mortar and grind them into a powder using a pestle.  Then add all the remaining ingredients and pound using a pestle for 10 minutes until the paste is smooth.  All the ingredients for the paste can be put into a blender and liquidized.  If the paste is too dry you may need to add a bit of water.  This makes 4-5 tablespoons of curry paste. 

GREEN CURRY WITH CHICKEN (or tofu or veg!)

1 ½ cup chicken breast- thinly sliced

2 cups coconut milk

4 tablespoons green curry paste

3 big eggplants cut into ½ inch pieces

½ cup smaller eggplant

2 tablespoons sugar

2 tablespoons fish sauce

2 kaffir lime leaves- torn into pieces discarding the stem (i have purchased dry kaffir lime leaves from the spice shop in Claremont NH)

1 cup basil leaves

2 chilli peppers (if you dare)

Put the coconut milk into a wok and fry for 3-5 minutes, stirring  continuously, until the coconut oil begins to separate out.  Then add the green curry paste and fry for 1-2 minutes.  Once the paste is cooked add the chicken and cook until the outside of chicken turns white.  Then add the big and small eggplants.  Simmer for about 4 minutes until the eggplants are lightly soft.  Then add the sugar and fish sauce, kaffir lime leaves and ½ of the basil leaves.  Turn off the heat and garnish with the other half of the basil leaves.  

OTHER WAYS TO USE LEMONGRASS:

  1. I add it to every broth I cook with- especially chicken broth- especially chicken broth thickened with coconut milk.  You do not eat the lemon grass directly- chop the bottom whiter/pinker bottom portion and simmer for deep healing aromatics.

  2. TEA!  As I was washing the lemongrass Ramone commented on the fever grass- I corrected him (lemongrass), he corrected me (fever grass).  So today I learned that lemongrass is known as fever grass in Jamaica.  Steep in hot water, sip it if you are feeling a cold coming on or currently sick- its good for what ails ya.